Photography is all about manipulating the amount of light that you let into your camera. Accordingly, to master taking photos in manual mode, you must learn how to manipulate the components that control light, namely: Aperture, Shutter speed, and ISO.
These three settings have a cause-effect relationship. That is, to register the same exposure, a change in one of the settings must be followed by a proportional change in at least one of the other settings.
Although this may seem daunting, learning it can be as easy as five simple steps. Let’s dive in!
Step #1 Understand the Path of Light
Suppose we follow the path of light through your lens and into your camera’s sensor. In this path, the light will first go through your lens’ aperture and camera’s shutter, before finally reaching your camera’s sensor.
You can control how much light is able to get through this path by adjusting your exposure settings. That is, by manipulating aperture shutter speed and ISO.
These three settings have a cause-effect relationship. Specifically, to register the same exposure, a change in one of the settings must be followed by a proportional change in at least one of the other settings.
Whatever combination of setting you choose will determine the overall exposure of your image.

Embed This Infographic: How a DSLR Camera Works
Step # 2: Learn About Aperture
 Aperture is the diameter of the hole inside the lens of a camera. You can increase or decrease the size of your aperture to control the amount of light that passes through your lens and reaches your sensor.
Making the aperture smaller will allow less light to reach your sensor while making the aperture larger will allow more light to reach your sensor.
Resource: Camera Basics: Aperture Explained (With Video)
Aperture and Depth of Field
Besides controlling brightness, the aperture is also responsible for the depth of the field.
The depth of field determines the amount of area within your frame that will be in sharp focus. In particular, it is the area between the nearest and farthest part of the image that appears sharp.
The DoF varies as you change your aperture settings.
Using a narrow aperture creates a deep depth-of-field. A deep depth-of-field means that a wide area of your image will appear in sharp focus. You’ll often see a narrow aperture used in landscape and architecture photography, where photographers aim to capture most of their subjects in great detail.

In contrast, a wide aperture creates a shallow depth-of-field. In this setting, only a small area of your frame is in sharp focus. Photographers often use wide apertures in portrait photography to help their subjects stand out against the background, such as in the image below.

Aperture and F-stop
Aperture is measured in F-stops. The F-stop value has an inverse relationship with the size of the aperture.
The higher you set the f-stop the value, the narrower the aperture becomes. Conversely, the lower you set your f-stop, the larger the aperture becomes.
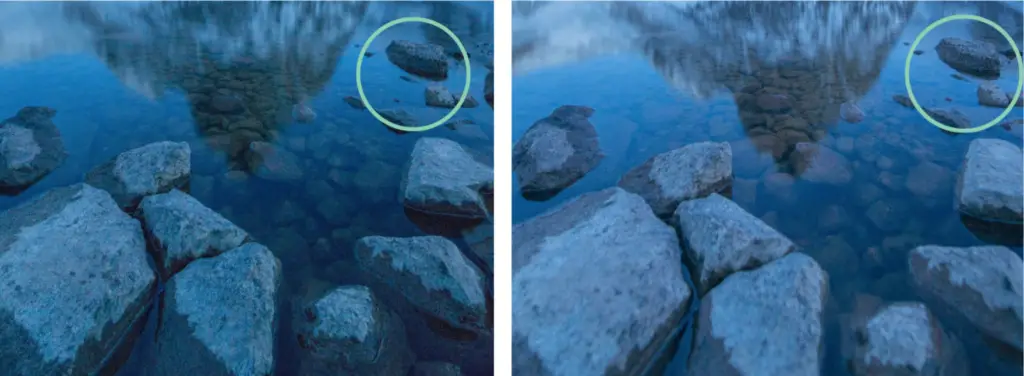
Let’s look at the two raw images below. These images were shot with two different apertures while holding the other settings (shutter speed and ISO) constant.
For the left image, I used a high f-stop value (f/13). As such, less light was allowed in the camera resulting in a darker image. For the right image, I used a larger aperture ( f/2.8). This time, more light was let in the camera resulting in a brighter picture.

To demonstrate depth-of-field, I boosted the brightness in both images below. I have also cropped the images to zoom in and circled where I have placed my focus.
Notice, while the area where I placed my focus has remained sharp in both images, the foreground of the images have different levels of focus.
Specifically, the foreground rocks for the left image, where I used a smaller aperture, are sharper compared to the right image. This is because I used a smaller aperture for the image on the left, which provided it with a deep depth-of-field. In other words, a larger area of the image on the left is in sharp focus compared to the image on the right.
The Trade-Off
When choosing which aperture settings to use, remember the trade-off between exposure and image sharpness.
That is, while using a low f-stop will make your image brighter, it will also make a larger area of your image blurry and out of focus. And while using a higher f-stop value will keep a larger area of your image in sharp focus, it will also limit the amount of light that can enter your lens.

Resource: Camera Basics: Aperture Explained (With Video)
Step # 3: Learn About Shutter Speed

Shutter speed is a measure of how long the camera’s shutter stays open. The longer the shutter stays open, the more light will reach the sensor, creating a brighter image. The shorter the shutter stays open, the less light will reach the sensor, creating a darker image.
Your choice of shutter speed will also influence motion blur. Motion blur is the streaking of moving objects when photographed with slow shutter speeds.
A slow shutter speed leaves the camera open longer, enabling the sensor to record a moving object across the frame. This results in blurry streaks of lines known as motion blur. Photographers typically use motion blur to give moving water a soft, dream-like quality in images, such as in the picture below.

Fast shutter speeds, on the other hand, close the camera’s shutter before the sensor records any movement. This immobilizes moving subjects, enabling you to capture them in crisp detail, as in the example below.
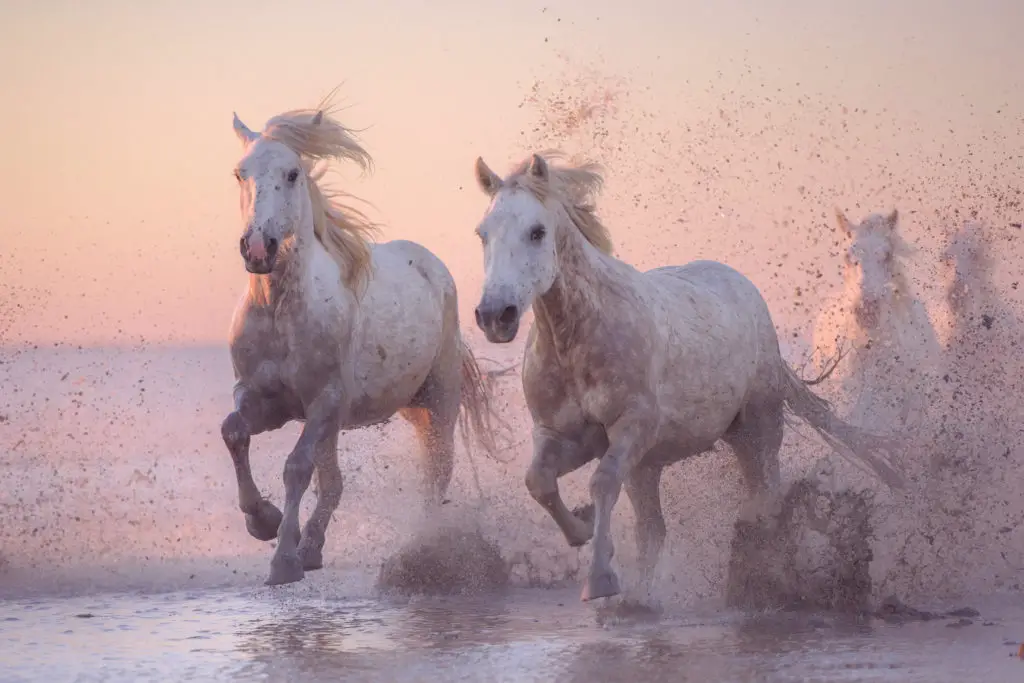
The appropriate shutter speed to use will primarily depend on your subject and the amount of light available in your surroundings.
For example, if you’re shooting fast-moving subjects, such as in wildlife photography, you’ll have to use fast shutter speeds. Using a fast shutter speed will allow you to capture your subject without motion blur.
On the other hand, if you’re shooting under low light conditions, such as astrophotography, you’ll have to use slow shutter speeds to get the proper exposure.
Resource: Camera Basics: Shutter Speed Explained (With Video)
Shutter Speed and Camera Shake
It’s important to remember that when shooting handheld (that is, without the use of a tripod), using slow shutter speeds will often result in camera shake.
A camera shake is a form of blur commonly seen in handheld images. It occurs when a camera moves while the shutter is still open, allowing the sensor to record the light from a single object across multiple pixels.
The rule of thumb is not to use a shutter speed slower than one divided by your focal length. For instance, if you’re using a 50mm lens, do not use shutter speeds slower than 1/50 of a second without mounting your camera on a tripod.
That said, this rule is only applicable if you’re not using image stabilization and extreme focal lengths, such as focal lengths higher than 200mm. For these, use the chart below.

Resource: Understanding Handheld Shutter Speed + Customizable Cheat Sheet
The Trade-Off
Choosing the best shutter speed is about balancing between exposure and motion blur.
While fast shutter speeds will allow you to capture your moving objects in great detail, it allows less light to reach your sensor. And while slow shutter speeds create brighter images by allowing more light to reach your sensor, it’s also prone to camera shake and motion blur.
Resource: Camera Basics: Shutter Speed Explained (With Video)
Step #4: Learn About ISO
Unlike aperture and shutter speed, ISO does not influence exposure by controlling the amount of light that reaches your sensor. Instead, it reduces the amount of time required to reach a proper exposure by altering the information that the camera sensor is gathering.
Using a higher ISO will enhance the data gathered by the camera’s sensor, creating a brighter image in a shorter amount of time.
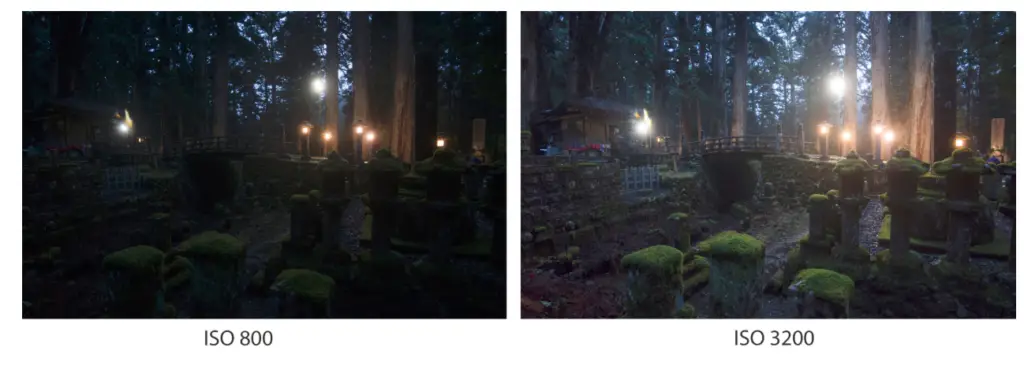
Let’s look at the images below. I took the left image with an ISO of 800 and the right image with an ISO of 3200 while keeping the aperture and shutter speed constant. As a result, the image on the right is much brighter than the image on the left.
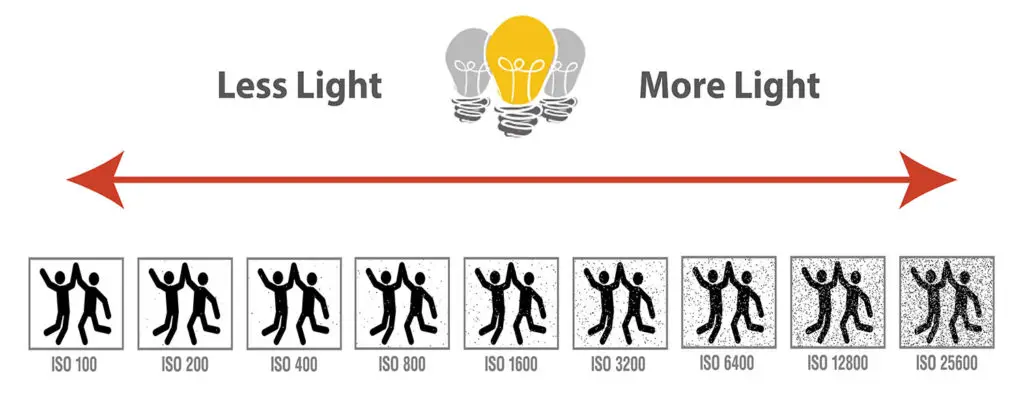
ISO and Noise
As you increase your ISO to increase exposure, you also increase the appearance of digital noise in your image. Digital noise is a visual distortion in the form of grain or discoloration typically found in images with high ISO.
These distortions increase in the appearance of noise decreases image quality, so it’s best to use the lowest possible ISO at all times.
Let’s examine the images below, for example. Since I used a lower ISO in the left image, the appearance of digital noise is less apparent in it compared to the image on the right.

To reach proper exposure without amplifying the presence of noise, you’ll need to use a wider aperture or slower shutter speed.
The Trade-Off
Choosing the appropriate ISO to use is about balancing between exposure and the acceptable amount of noise in your photos.
In most cases, you’ll want to aim for proper exposure with minimal digital noise.
The Exposure Triangle

You may have heard of the exposure triangle. In case you are wondering what it is and how it works, I’ll explain briefly.
The exposure triangle is a visual representation of the settings that directly influence the exposure of your images: Aperture, Shutter Speed, and ISO.
A triangle is a great tool to help remind you of the three camera settings that determine exposure. The shape is irrelevant and doesn’t tell you how to adjust your settings to reach a proper exposure.
You don’t need to understand it to master shooting in manual mode; most people only use it as a memorization tool.
Manual Cheat Sheet
Your choice of Shutter Speed, Aperture, and ISO affect more than just exposure. They also impact image sharpness, depth of field, and digital noise, respectively.
When shooting with manual mode, understanding the overall aesthetic impact of adjusting each setting is necessary to create an image with desirable exposure and quality.
If this sounds overwhelming, don’t worry. Your camera has built-in tools to help you determine the appropriate settings for the best exposure. One of which is the camera light meter.

Step #5 Use Your Light Meter

The camera has a built-in light meter that reads exposure by measuring the amount of light reflecting from the objects in a scene.
You can find your light meter either on the Live View display or the LCD screen on top of your camera. It is made up of a series of blocks of lines accompanied by numbers. These numbers represent exposure values that indicate how dark or bright a particular image is.
A properly exposed image will have an exposure value of zero. An Image with a negative exposure value is underexposed, and an image with a positive exposure value represents overexposure.

If you have either a negative or positive exposure value, adjust your exposure settings accordingly.
When Not To Use The Light Meter
The camera’s light meter is programmed to interpret light by turning colors into tones of grey. It’s the baseline for proper exposure is 18% reflectance in visible light (mid-tone grey).
But our world is not gray. As such, there are times when your camera’s light meter will provide an incorrect interpretation of reflectance.
Light meters generally misinterpret scenes with plenty of highlights and shadows.
For instance, the light meter often interprets snow-covered scenes as overexposed, even when they are correctly exposed. This miscalculation is because snow is twice as bright as gray.
Conversely, images with a lot of shadows, such as a black wall or pictures of silhouettes, are often read by the light meter as underexposed.
When using the light meter to guide you in getting the correct exposure, it’s important to be mindful of its limitations. It’s a helpful tool, but only when used judiciously.
Step #6: Study Your Histogram
 Another built-in tool you can use for measuring exposure is your camera’s histogram.
A histogram is a graphical representation of how bright the pixels in your image are.
The x-axis is the range of brightness value in a photo, ranging from 0 to 255. A zero value in the x-axis means pure black, while a 255 value means pure white.
In general, brightness values ranging from 0 and 85 represents shadows; brightness values between 85 and 170 represent mid-tones, and values between 170 and 255 embody the image’s highlights.
The y-axis measures the total count of pixels at each brightness value. The higher you are on the y-axis, the more pixels that are present at that brightness value.
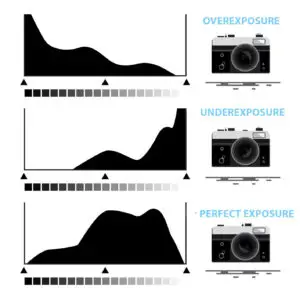 Images that have the majority of their pixels located in the mid-tone range will contain sufficient brightness and detail.
On the other hand, images that have the majority of their pixels near 0 and 255 on the x-axis will have little to no detail. An image with most of its pixels on or around 0 is underexposed, while an image with most of its pixels on or around 255 is overexposed.
When Not to Use The Histogram
Similar to the light meter, using the histogram to interpret exposure, has limitations.
For instance, when taking pictures of silhouettes, the histogram is likely to be shifted to the left. This is fine because the scene necessarily must consist of primarily dark objects.
Similarly, if you take a picture of a white wall, your histogram is likely to be shifted to the right. This is expected since a white wall scene consists of primarily bright objects.
In both cases, adjusting your exposure to create a histogram consisting primarily of mid-tones will not yield the best results. Thus when examing your image’s histogram for exposure, consider all the elements within a photo before making any exposure adjustments.
Step #7: Practice with Priority Camera Modes
This step is optional but using is a great way to ease your way into manual mode.
Priority modes allow you to set two settings while the camera sets the third for proper exposure. This is a great way to understand the relationship between exposure settings.
Make sure when you use a priority setting that you pay attention to all three settings you are using. In particular, when you adjust one of your settings, it’s important to understand how the camera adjusts the final set to reach proper exposure.
Aperture Priority
In aperture priority, you set your aperture and ISO while your camera will set the shutter speed for optimal exposure.
When using aperture priority, you will control the depth of field of your images. But, since the camera sets the shutter speed, you will have little control over the appearance of motion.
Aperture priority is a great setting to understand the relationship between aperture and shutter speed. In particular, to increase your depth of field, you need to use faster shutter speed.
Shutter Priority
In Shutter Priority mode, you set the shutter speed and ISO while your camera will automatically set the aperture for optimal exposure.
When using shutter priority, you will control how motion is captured in your images, but you will have little control over your depth of field.
Shutter priority is a great shooting mode for understanding the relationship between shutter speed and aperture. In particular, when you use long exposures, you need to use a narrow aperture for optimal exposure.
Resource: How to Use Your Camera: Understanding Camera Modes

hello Vinci,
thank you so much for this article,I’ve now understood exposure pretty well and the artistic side of each of the three exposure triangles,I’m now confident when i hold a camera,I don’t shoot in auto again,either i set one of the three as priority or I set all in manual,also that histogra,I didn’t know the purpose of it whenbivopen Adobe camera raw in photoshop ,I thought it was some technical thing just to confuse.us for me i saw it as something stupid with no essence 😂😂
but I’ve know get a grip of it too
thanks so much