What is Aperture?
 The aperture is the hole inside the lens of your camera. You can increase or decrease the size of the aperture to change the amount of light that reaches your camera’s sensor.
You’ll often hear the lens aperture be compared to the pupil in the human eye.
To understand why, think of the eye as the lens for our bodies, capturing and recording information that is within our line of sight. The pupil is an opening in the center of the eye’s iris that regulates the amount of light that is let into the eyes.
Your lens’ aperture is the equivalent of the pupil, controlling the amount of light that enters your camera. Making the aperture smaller will let in less light into your camera while making the aperture larger will let in more light into your camera.
 The only difference between your pupils and your lens’ aperture is that the changes in your pupils are instantaneous and automatic.
Walk into a dark room, and your pupils will automatically dilate, letting in more light into your eyes. Enter a brighter location, and your pupils will automatically constrict, allowing less light into the eyes.
The aperture, on the other hand, is adjusted by you, the photographer. To get the proper exposure, you must know how small or big to set your aperture.
What is an F-stop?
The aperture opening is measured in F-stops, also known as the Focal Ratio.
F-stop = f/n
Where f is the focal length; n is the aperture diameter.
What this formula shows is that there is an inverse relationship between aperture diameter and the f-stop value.
That is, the smaller the f-stop value, the wider the aperture diameter will be. This can be confusing. So let’s examine it further.
Suppose you have a 50mm lens and you set your aperture to f1.8. If you calculate the aperture diameter, you’ll arrive at 27.8mm.
F1.8 = 50mm/n
n= 50/ 1.8
n= 27.8 mm
Now, if we set your aperture setting to F16, the new aperture diameter becomes 3.1mm, which is a much smaller number.
f/16= 50/n
n= 50/ 16
n = 3.125
As you experiment with different apertures, you’ll notice that the f-stop value does not increase in a linear fashion.
This is because f-stop values increase or decrease geometrically in powers of the square root of two.
 What this calculation means is that every time you decrease your f-stop by one stop, the area of the aperture hole doubles, letting in twice the amount of light.
In the same way, increasing your f-stop by one stop reduces the amount of light entering your camera in half.
What is Depth of Field?
Besides controlling exposure, the lens aperture is also responsible for the Depth of Field (DoF).
The depth of field determines how much of your image will be in focus. In particular, it is the area between the nearest and farthest part of the image that appears in sharp detail.
Your depth of field will vary as you adjust your aperture settings.
Using a wide aperture, that is, a small f-stop value decreases your depth of field. Photographers refer to this as a shallow depth of field.
A shallow depth of field means that less area of the image will be in focus. You’ll often see this type of aperture setting used in portrait photography.

When taking photos of people, photographers typically keep their subjects in sharp focus while leaving their background soft and hazy.
On the other hand, using a narrow aperture, which is a large f stop, will increase your depth of field. This is also referred to as a deep depth of field.
A deep depth of field means that a greater area of the image will appear in sharp focus.
Landscape photographers generally use narrow aperture settings to capture sweeping scenes in great detail.

If that sounds complicated, here’s a simple way you can think about it:
A small f-number means a small area of focus. A large f-number means a large area of focus.
Small f-number = Small area focus or Shallow DoF
Big f-number = Large area Focus or Deep DoF
Depth of Field Example
As mentioned, Depth of field is the area between the nearest and farthest part of the image that appears sharp. To understand this better, let’s look at some examples.

For the image on the left, I used a narrow aperture (f/13). This image has a deep depth of field, which means the majority of my frame was kept in sharp focus.
In contrast, I used a wider aperture ( f/2.8) for the image on the right. This image has a shallow depth of field, which kept a narrower area within my frame in sharp focus.
For both images, I have placed my focus in the corner of the frame, circled in blue.
Notice, while the area where I placed my focus has remained sharp in both images, the foreground of the images have different levels of sharpness.
While the foreground rocks on the left image appear sharp, the foreground rocks on the right image appear blurry. The foreground on the right image appears blurry because it has a smaller area of focus or shallower depth of field than the left image.
The Trade-Off
There are two main reasons that you would adjust your aperture:
- To control the exposure of your images, or;
- To set your depth of field.
When choosing your aperture setting, remember the trade-off between exposure and depth of field.
That is, while using a small f-stop lets in more light to enter your camera, it keeps a smaller area within your image in sharp focus.
Similarly, while using a large f-stop will keep most of your image in sharp focus, it limits the amount of light that reaches your sensor.
You cannot capture maximum light and have most of your image in sharp focus by simply adjusting your aperture.
If you want to have an image that has a large area of focus without sacrificing exposure, you’ll have to use the other settings that control exposure – shutter speed and ISO.
Aperture Settings Cheat Sheet

Where Is The Aperture Value Located?
You can find the aperture value you are using in different locations.
The first is on the small LCD screen on top of your DSLR. This style of LCD screen is common in Nikon and Canon cameras.
![{"A?":"B","a":5,"b":1574423625571,"c":"DADpsUKviFI","d":"B","A":[{"A?":"J","A":213.93270472911524,"B":653.8868787842844,"D":233.63818003545327,"C":206.24777725459975,"a":{"D":500,"C":500},"b":[{"A":"M433.1-1H66.9C29.7-1-1 29.7-1 66.9v366.2c0 37.2 30.7 67.9 67.9 67.9h366.2c37.2 0 67.9-30.7 67.9-67.9V66.9C501 29.7 470.3-1 433.1-1zM486 72v361.1c0 28.9-24 52.9-52.9 52.9H66.9C38 486 14 462 14 433.1V66.9C14 38 38 14 66.9 14h366.2C462 14 486 38 486 66.9V72z","B":{"C":"#fd4f4f"}}],"c":{"A":{"A":151,"B":151,"D":198,"C":198},"B":278.2824647779637,"C":210.25347039646726,"D":"A","E":"A"}}],"B":900,"C":600}](https://pixelsandwanderlust.com/wp-content/uploads/2019/10/1.png) If you do not have an LCD screen on top of your camera, it is typically located on the front LCD screen.
If you do not have an LCD screen on top of your camera, it is typically located on the front LCD screen.
It is important to note that you will typically only see your aperture value on the front LCD screen if you are shooting in live-view mode.
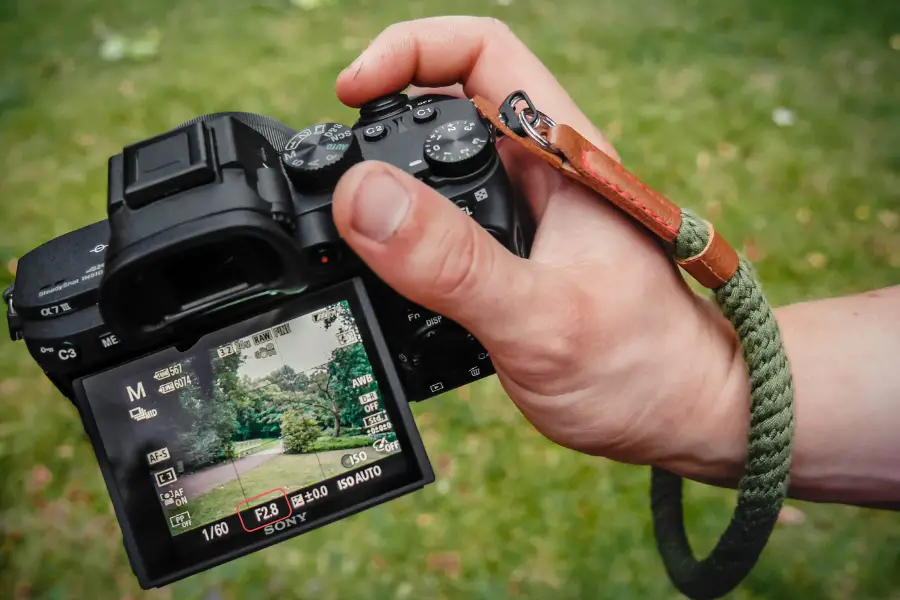 The aperture value is either at the top or bottom of the front LCD screen of your camera.
You can also find the aperture value you are using on the lens itself. Although not all cameras have markers indicating the current aperture, it is common in older and manual lenses.
How To Change Your Aperture?
With so many buttons, dials, and switches, It can be confusing when you first hold a DSLR or mirrorless camera in your hand.
For most cameras, the aperture can be changed using a dial on the right-hand side of the camera. This dial is typically partially exposed. Moving it to the right will increase your aperture value, and moving it to the left will decrease your aperture value.
 The exact location of your aperture dial may differ depending on the camera you are using, but for the most part, its design and general location have become standard for most cameras. If you can’t find the aperture dial on your camera, an easy way is to look at your camera’s manual.
You can always just google search the brand and model of your camera followed by “user guide”. You will typically find the location of the aperture dial in the controls section of the manual. This section is normally towards the front of a cameras user manual.
Aperture and Lenses
Maximum and Minimum Aperture
The aperture maximum and minimum values you can use will depend on the lens you are using. Different lenses have different maximum and minimum aperture values. This is important to remember because it will determine how shallow or deep you can set your depth of field.
Remember, if you switch a lens, you are most likely also changing the maximum and minimum lenses you are able to use. As a result, the depth of field that you can capture in your image.
The maximum aperture refers to the smallest f-stop or widest aperture values a lens is capable of. The minimum aperture refers to the highest f-stop or narrowest aperture values a lens is capable of.
The maximum aperture of a lens is typically located somewhere on the lens. The position will vary based on the lens you are using. Unfortunately, the minimum aperture of a lens is not located anywhere on the lens.
A simple way to determine both the maximum and minimum aperture is to google search the specs of the lens you are using. In most manufacturers or online retail stores, the maximum and minimum aperture of every lens will be clearly stated.
Fast / Slow Lenses and Aperture
If you are new to photography, you may hear the terms “fast” and “slow” when describing lenses. At first, this concept was a bit confusing to me. Although it refers to the shutter speed that you can use with a lens, it is dictated by the maximum aperture of a lens.
As a result, lenses with very high maximum apertures are referred to as fast, while lenses with low maximum apertures are considered slow.
Lenses with high maximum apertures are referred to as fast. This is because the wider your aperture goes, the more light that can reach your sensor. As a result, you can use fast shutter speeds and still capture a properly exposed image.
Lenses with a lower maximum aperture will have to use slower shutter speeds to maintain proper exposure. As a result, they are referred to as slow.
There is not a definite range of maximum aperture values that are considered as fast or slow. Rather it is better used to compare to lenses. That is, a lens with a maximum aperture of f/1.8 is faster than a lens with a maximum aperture of f/3.5.
I typically consider lenses with a maximum aperture higher than f/2.8 fast. On the other hand, lenses with a maximum aperture lower than f/3.5 are typically considered slow. Whether a lens is fast or slow can also depend on the type of photography you are doing.
Aperture and Camera Modes
Settings your aperture is important if you want to maintain control over your depth of field. If the camera sets your aperture, you will not have as much control over the elements that will be in focused and those that will not be in focus.
It is important to remember that there are only two settings that you can use that will allow you to set your aperture: aperture priority and manual mode. If you are in any other mode, your camera will set the aperture value for you.
Aperture Priority
In aperture priority, you set your aperture and ISO while your camera sets the shutter speed for proper exposure. This setting will allow you to control your depth of field while also allowing you to find proper exposure quickly.
Manual Mode
In manual mode, you set all your exposure settings: aperture, shutter speed, and ISO.
Manual mode gives you the most creative freedom of all the shooting modes, but it is the hardest to learn and most time-consuming.
