Looking to improve your Macro Photography? You’re in the right place!
Over the years, macro photography has become more popular with professional photographers and hobbyists alike. With the rise of social media, high resolution, portable cameras, and lenses, it’s not hard to see why this photography niche has grown so rapidly.
In this article, we’ll go over 8 practical tips enough to help you improve your Macro food photography. Let’s dive in!
What is Macro Food Photography
 Before we go over the different ways you can improve your Macro photography, let’s first go over its definition. What is Macro photography?
Macro photography refers to close-up shots that allow the viewer to see the smallest details in the scene. Photographers generally use macro lenses to capture these types of images in crisp detail. Although, this type of photography is not exclusive to using specific types of lenses.
Macro photography is most commonly used in food photography. Using this type of perspective allows the audience to clearly see the details in the food and visualize what it will taste like.
Tips for Better Macro Food Photography
1. Use a macro lens
Macro lenses are specifically designed to allow photographers to capture their subject up close without compromising depth of field. That is, it allows you to take images of things at a really close distance with clear, sharp details.
A macro lens allows you to focus on objects that are as close as 30cm away from the lens. This is unmatched by other types of lens, which typically require objects to be at least one foot away.
Macro lenses also offer a 1:1 magnification ratio which is crucial to macro photography. A 1:1 magnification ratio allows macro lenses to capture objects and display them in the same size as their actual size.
Here are some lenses that are great for professional macro food photography.
| Brand | Focal Length | Maximum Aperture | AF Motor | Price |
|---|---|---|---|---|
| Nikon | 105mm | f/2.8 | Yes | Check Price |
| Canon | 100mm | f/2.8 | Yes | Check Price |
| Sigma | 105mm | f/2.8 | Yes | Price Check |
| Sony | 90mm | f/2.8 | Yes | Check Price |
2. Use Fast Shutter Speed
Fast shutter speed allows you to take sharp images by minimizing camera shake. Because macro lenses tend to exaggerate details, the slightest camera movement can compromise your composition.
Further, because most macro images are shot handheld, the camera is often not stable.
This makes it difficult for macro photographers to take crisp images with their macro lenses.
That said, while using a faster shutter speed minimizes shake, it also reduces the amount of light that can enter the camera. To get around this, remember to experiment with your aperture and ISO to make sure you have enough light.
Adjusting your ISO and aperture for exposure does affect the quality of your images. Increasing your ISO, for instance, amplifies brightness but also exaggerates noise in your image.
Resource: Camera Basics: Shutter Speed Explained (With Video)
3. Use a Tripod
Macro photography exaggerates every detail, including the slightest camera movement. As such, using a tripod is highly recommended to avoid blurry images. This is especially important when using slower shutter speeds.
While you can reach proper exposure by adjusting your ISO, it’s often not the most ideal.
Raising your ISO can help increase the brightness in your image, allowing you to use slower shutter speeds, but it also increases the appearance of noise.
When shooting in low light, experiment with your aperture and shutter speed first before increasing your ISO.
When using a tripod, make sure it’s stabilized. Unstable stable tripod legs will produce blurry images, which defeats its purpose. Also, don’t use VR mode. If you can, use a remote shutter or a timer to avoid the shaking of pressing the shutter button.
Resource: Best Budget Travel Tripods (under $200)
4. Master Aperture
Understanding aperture and depth-of-field is vital for any kind of photography.
- The aperture is the hole inside the lens of your camera. You can increase or decrease the size of the aperture to change the amount of light that reaches your camera’s sensor.
- The depth of field determines how much of your image will be in focus. In particular, the area between the nearest and farthest part of the image appears in sharp detail.
Your depth-of-field will vary as you adjust your aperture settings. If you’re unsure about this topic, you can check out this tool we’ve created to understand the depth of field.
A wide-open aperture shot (e.g., f/2.8) provides a narrow depth of field. That means only a small amount of area in your image will be in focus, while the rest will be blurred. You’ll often see this in portrait and macro photography. Where the subject is in focus but the background is blurry.
On the other hand, a narrower aperture (e.g., f/9) allows a bigger depth of field, allowing you to focus a wider area in your frame.
To control which area you want your audience to look in, you must experiment with aperture.
You can use aperture priority mode, which allows you to choose the aperture, while the camera selects the best ISO and shutter speed. This makes it fast and easy to choose the right exposure.
5. Know your lens’ Minimum Focusing Distance
All lenses have a minimum focusing distance. This is the shortest distance in which your lens can focus.
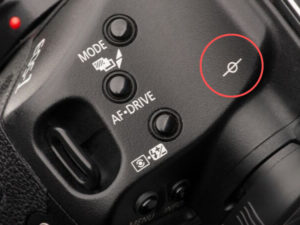
Getting closer to your subject than the minimum focusing distance will render it out-of-focus and blurry. The minimum distance is calculated from the camera’s focal plane mark, typically found near the shooting mode dial.
Most DSLR cameras will mark this point with a line through a circle (pictured below).
6. Change your vantage point
Vantage point refers to the position from which you take a photo. Changing your position changes the relationship between the background and your subject.
Using different vantage points is one of the easiest ways you can alter the look and feel of an image. The subtlest alteration can change the visual story of your image entirely.
Mastering different vantage points is one of the easiest ways to create interesting compositions out of the simplest scenes.
Try both low and high vantage points before settling into a composition. By changing your position multiple times during a shoot, you can ensure you get the best results possible.
7. Creative Background
 Your background is just as vital to your composition as your subject. Even a bokeh or blurry background can’t save an image from a distracting background.
Identify distracting visual elements such as bright objects, lines, spots that take attention away from your subject. If you can move an object out of your frame, do so. It’s much easier to do this than having to edit the entire object out in post-processing.
8. Edit your images
It’s one thing to take a photo, quite another to edit it to perfection.
If you have seen an amazing image, chances are they are the result of good post-processing work and not just skillful shooting.
Editing software like Photoshop and Lightroom are invaluable investments in photography.
You can also use services such as expert photo editors for a very low price and a simple process. Hiring someone to edit your photo doesn’t have to be expensive, but it can save you a lot of time and help you make the most of your images.
Conclusion
There you have it, eight simple and practical tips on how to better your macro photography.
Macro photography is an exceptional way for capturing high-quality, unique images. It’s wonderful for taking photos of food, animals, and nature.
No wonder it has earned its place as a favorite among professional and hobby photographers. No matter which category you fall in, macro shots can easily be one of the most stunning and unique images in your portfolio with enough patience and practice.