
With sweeping scenes and breathtaking subjects, most beginner landscape photographers may feel like they have an advantage in creating impactful images.
While landscape photography undoubtedly deals with powerful scenes, it’s also at risk for appearing monotonous, empty, and visually uninteresting.
Landscape photography, just like any photography, needs deliberate practice and refined techniques.
Here, I’ll provide my 31 tips to help bolster your skills and quicken your growth as a landscape photographer.
1. Learn About the Basics of Manual Exposure
One of the most crucial points of advice in photography is this: study your camera’s exposure settings.
Your set of exposure settings will determine the amount of light that’s registered by your camera. The camera’s exposure has three basic components: shutter speed, aperture, and ISO.
Let’s review each one here:
Shutter speed regulates the speed at which your camera’s shutter closes. When you click the shutter button, the camera’s shutter closes to capture an image.
Aperture is the size of the iris opening in the lens. Your aperture setting determines the amount of light that can enter your lens and reach your sensor. The value is given as a fraction often referred to as f-stops.
ISO is a setting that allows you to amplify the data that the sensor recorded. A higher ISO will apply more amplification and make an image brighter. One downside of increasing ISO is that it increases the presence of noise.
You have the ability as a photographer to alter these factors on your camera. When each one is set at the right value, you’ll achieve the proper exposure for an image.
Understanding how to manipulate these three settings is vital to controlling the outcome of your images. To be an effective landscape photographer, you must be able to adjust the Aperture, Shutter speed, and ISO settings in a way to suit any lighting condition.
Resource: How to Use Your Camera: Understanding Exposure
2. Use Photographic Filters
Landscape photography is all about manipulating ambient light. And one of the best tools to successfully do so is photographic filters.
Lens filters such as polarizers and neutral density filters enable you to control the available light to achieve your desired visual effect.
One typical example of this photographs featuring moving water, such as waterfalls, streams, and beaches.
To capture the water’s movement, you need to work with slow shutter speeds. This enables the sensor to record traces of the water as it moves across your frame.
ND filters limit the amount of light that enters your camera. This allows you to shoot with slower shutter speeds without risking overexposing your image.
Polarizing filters are also built to help you manipulate light in your images. For instance, By using a polarizing filter, you can minimize distracting reflections off of surfaces.
Polarizing filters also help saturate the colors in your images by reducing the light that enters the camera, intensifying the sky’s natural blue and the grass’ green tones.
Note that a polarizing filter may minimally impact a shot (if at all) when you’re facing the sun or have your back to the sun. For a polarizing filter to have a significant effect, a photographer should be at a 90-degree angle in relation to the sun.
Landscape photographers may also struggle in balancing the exposure between the dark foreground and bright sky.
If you’re running into this issue, you can use graduated ND filters. This type of filter allows you to darken the sky and lighten the foreground to achieve balance while you’re taking a photograph.
All landscape photographers can benefit from photographic filters. These tools should be a constant fixture in your collection of photography gear.
Resource: How to Photograph Water: The Ultimate
3. Use the Histogram
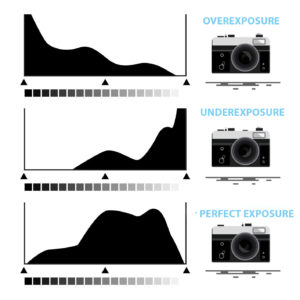 A histogram is a built-in camera tool used to determine if an image is correctly exposed.
In particular, it provides you with a graphical view of how bright the pixels are within an image. The x-axis represents the level of brightness, and the y-axis represents the total number of pixels.
Underexposed images will have a curve that is highest toward the right of the x-axis. While overexposed images will have a curve that is highest toward the left side of the x-axis.
A properly exposed histogram will have a bell-shaped curve with the highest point at the center of the x-axis.
Note that although an image with a bell-shaped curve is likely to be correctly exposed, this does not mean properly exposed images are only bell-shaped.
The shape of the curve is dependent on the elements in a photo. A photo with lots of bright objects is likely to have a histogram that is shifted to the right.
The key to using your histogram is making sure that it is in line with the contents of your image.
For example, if you are shooting on a white snowy day, the histogram curve will not be bell-shaped but instead shifted to the right. Likewise, if you are shooting a dark scene, your histogram will likely be shifted to the left.
Resource: How to Use Your Camera: Understanding Exposure
4. Shoot in RAW Format
Compared to JPEGs, RAW files produce higher quality images with excellent editing flexibility.
This file format is perfect for landscape photography because it produces images with a high level of quality and detail. Also, the editing power and flexibility of a RAW image allows photographers to adjust nearly any feature of an image with ease.
5. Invest in a Good Tripod
Investing in a good quality tripod is essential for two main reasons: durability and ease.
Durability will keep your tripod in working condition for a long time. This is true even with the wear and tear that outdoor shooting conditions cause.
Low-quality tripods are quick to break and will often need replacement. So, even though good quality tripods are more expensive, you’ll most likely save money over time.
As an example: When I was just starting as a photographer, my low-priced tripod broke within the first month. After that, I invested in a high-quality tripod, and I haven’t yet had to buy a replacement since.
Tripods are at the mercy of Mother Nature when you take them outside to shoot. So, as a landscape photographer, a durable tripod must be part of your photographic tool kit.
Another reason you should invest in a high-quality tripod is that it will function better than an inexpensive one.
In high winds, for example, quality tripods will remain stable, while an inexpensive tripod will likely be unsteady.
You also want to be able to drop the legs of your tripod at a moment’s notice. With this ability, you can make quick changes to shot and adapt to the environment around you.
Well-made tripods will be able to do this with ease, while inexpensive tripods may require time and effort. In the time that it takes for you to adjust your tripod, you could miss out on a fleeting shot.
Using a quality tripod will ensure that you’ll be able to act quickly and capture nature’s spontaneous wonders.
6. Invest in a Good Tripod Head
Tripod legs are important, as stated above, but so is a tripod head.
In practice, most photographers choose between pan and tilt head or a ball head.
I travel regularly, so I prefer ball heads since they are usually less bulky and easier to pack. Other than portability, I also find them easy and efficient to use.
Pan and tilt heads have handles that extend out, so the overall structure is larger than a ball head. This requires extra space in your luggage or camera bag.
That said Pan and Tilt heads are more accurate in-camera leveling. Ball heads function as the fulcrum, which can make camera leveling less precise.
Which type of tripod head to use is a personal choice. If you want speed and portability, I suggest you go for a ball head. But if you care more about precision, pan and tilt heads may be a better option for you.
Of course, you can also purchase both types of tripod heads and switch them out depending on the situation. Both types of heads will fit onto the same tripod legs.
One extra accessory that I should mention is the L-bracket. An L-bracket gives you another tripod mount on the left side of your camera. This is particularly useful for photographs trying to shoot vertically on a tripod.
Photographers can use this accessory to change the camera from horizontal format to vertical format without requiring you to move the tripod head position.
I think an L-bracket is an ideal tool for anyone who enjoys landscape photography, and I would highly recommend it.
7. Level Your Images
The horizon should create a straight line in most landscape images.
You may make this adjustment in post-processing, but this will lead to a loss of visual data, so it’s ideal to achieve it during your shoot.
This is especially problematic if you’ve placed critical visual elements near the edges of your image.
To help you prevent slanted pictures, you can use your camera’s gridlines. Most tripods also offer built-in levels, so consider utilizing those as well.
8. Bring Backup
When you’re out shooting, the last thing that you’ll want to deal with is a dead battery or full memory card.
Cover your bases by packing extra batteries and memory cards. In doing this, you’ll protect yourself from the frustration of having a photoshoot cut short.
Battery power and storage space aren’t the only logistics to consider. Prepare for rain and debris getting onto your equipment by bringing along an umbrella and a lens cloth.
Preparation can be time-consuming, but it will secure your odds of catching the perfect shot when it comes along.
9. Use a Wide Angle Lens
A wide-angle lens can display an extended view of a scene, ideal for expansive subjects such as landscapes.
For example, vast mountain ranges and impressive waterfalls will likely benefit from being photographed by a wide-angle lens.
Wide-angle lenses are also great for emphasizing the details of a landscape. These lenses typically provide more depth of field than telephoto lenses, enabling you to capture most of your image in sharp focus.
When you use a wide-angle lens in landscape photography, be sure to try out different angles.
A minuscule adjustment to the angle of the camera can drastically shift the quality of your image.
Also, remember to try with both horizontal and vertical format — experiment with both to see what supports your intended purpose better.
Resource: 12 Tips on How to Use Wide Angle Lens in Landscape Photography
10. Try Vertical Orientation

The traditional landscape photograph has a horizontal orientation. We even call it “landscape orientation.” But, that doesn’t mean that a vertical landscape shot can’t be successful, too.
Scenes with tall vertical elements, such as forests and architecture, often work well when shot vertically.
Shooting these compositions vertically encourages the viewers to view your image up and down instead of side to side. This effect on your viewer is a great way to enhance the height and depth of the vertical elements in your photo.
So, don’t go on auto-pilot and shoot all landscapes horizontally “just because.” Consider the value that a vertical orientation could provide to your photographs.
11. Compose in Thirds

The rule of thirds is one of the most well known compositional tools in photography.
According to this rule, an off-center subject adds greater value to the aesthetic of an image than a subject placed dead center.
To utilize the rule of thirds, imagine four lines in your image: two stretched horizontally, and two stretched vertically. Thus, dividing your frame into nine equally sized squares.
By placing the most important aspect of your image on or along the lines of intersection, you’ll be able to create visually appealing photos.
You can apply the grid to your frame using your camera, or you can use your imagination.
To add the grid overlay to your camera by selecting the menu button and scrolling down until you find Grid Display. Once selected, you will have several options to choose from. The rule of thirds grid is typically titled 3×3.
The unbalanced aesthetic created with this technique helps enhance the visual appeal of landscape images.
12. Use the Rule of Odds

The rule of odds in photography states that photos featuring an odd number of elements are visually superior to those with an even number of elements.
Because an even number of elements can be equally organized in half, they tend to divide your viewer’s focus. This disunity serves to minimize an images’ visual impact and often results in visually uninteresting images.
Odd numbers can’t be divided equally by your viewer. This effect creates tension within the image, drawing the viewer in.
It’s worth noting that the rule of odds doesn’t apply to all odd numbers. When photographers talk of the rule of odds, they are often referring to the number three.
The rule of odds is the most effective when you position your focal point at the center. This will pull ample attention to it as the focus of your image.
Resource: 23 Composition Techniques for Travel Photography
13. Use Leading Lines and S-Curves
You can use leading lines and S-curves to attract attention to your images. These tools are simple but highly effective in composing striking photographs.
Leading lines draw your viewer’s eye to your chosen focal point. This tool uses our eyes’ natural inclination to visually follow lines until they come together and disappear on the horizon. By positioning your subject at the intersection of receding lines, you significantly raise their visual impact.
Leading lines may be physical, as in a road, path, or river. Or, they may be implied, taking the form of light beams or ripples in a body of water.
Contrastingly, S-curves use bent outlines to help guide viewers towards your focal point. Because of its natural flow, objects placed along the curve are likely to capture the viewer’s attention as well.
An S-curve strongly denotes movement, spurring a sweeping motion for the viewer’s eye. A downward slope implies speed, while an upward curve builds stress and drama.
An S-curve strongly denotes movement, spurring a sweeping motion for the viewer’s eye. Any subjects positioned along the curve will have a heightened visual impact.
Leading lines and S-curves are great tools you can use to strategically guide your viewer’s through your landscape images.
14. Negative Space
We’ve all heard the saying, “less is more”. This is especially true for landscape photography.
When taking images of vast, beautiful landscape, it can be difficult to resist including everything you see in your frame. But, no good can come of cramped and cluttered images.
An image that’s overwhelmed by visual elements will draw attention away from your subject. The focal point will be muddled, and the visual impact will be compromised.
In contrast, sweeping negative space enhances the impact of the subject and emphasizes it.
Images with negative space are more pleasing to a viewer because they offer a chance to rest the eyes. They provide your viewers with breathing space, encouraging them to explore more of your image.
Learning how to use negative space effectively will keep your image from being too “busy” and distracting.
You’ll find as you hone your skills in landscape photography that the best images are the result of the dedicated reduction.
Resource: 11 Compositional Mistakes Beginner Photographers Make
15. Deepen Your Depth of Field
In landscape photography, you’ll generally want to use a deep depth of field to capture the entire scene in sharp focus.
Of course, there may be times when you’ll want to try using a narrow depth of field for creative shots. But, typically, a sharp, sweeping landscape view is the way to go.
You can do this by selecting a small aperture setting; remember that a smaller aperture is associated with a bigger f-stop number.
A fact to consider is that a smaller aperture will make for less light reaching your camera sensor. You’ll need to counteract this with longer shutter speed or a higher ISO.
16. Look for a Focal Point

Every image needs to have a focal point. Your focal point is the element that pulls your viewer’s attention and brings interest in the picture. It is what makes an image compelling and meaningful.
Without one, an image will appear visually confusing and dull. Your viewer won’t have a visual point to latch onto and explore.
There are plenty of different focal points that you can choose for a landscape image. For instance, you could pick a uniquely shaped tree, a rock formation, a human silhouette, or a work of architecture.
Make sure that you have a clear idea about the focal point of an image while you’re shooting. Consider where you want viewers to look and work on drawing visual attention to that spot.
While the focal point in and of itself is crucial, you also need to think about how you position it.
The rule of thirds is a useful tool during this step in the composition process. You may also consider secondary frames or leading lines.
Also, pay attention to the relative brightness of the elements in your image. Remember that the viewer will be drawn to the brightest part of your image first. So, it’s important that you place your focal point on or around that area.
Simply put: every image that you take should have a clear focal point. A picture without one will lose its meaning and have no story.
When an image has a distinct, powerful focal point, the result is visually compelling.
Resource: 11 Compositional Mistakes Beginner Photographers Make
17. Think Foregrounds
You can make your landscape images special by giving extra attention to the foreground of each shot.
By positioning interesting elements in the foreground, you can enhance depth, sense of scale, and the overall aesthetics of your image.
To enhance depth in a landscape photo, consider positioning greenery, plants, or rocks in the foreground.
Foreground objects will seem larger relative to the middle-ground and background elements, and therefore seem closer to the viewer. This creates a 3-D effect that’s often lacking in 2-D images.
The overlap between elements in the foreground and background can add a sense of depth. If an object in the foreground overlaps with an object in the background, it will appear closer to the viewer.
Other than enhancing depth, photographers can also utilize elements in the foreground to strategically guide a viewer’s eyes through an image.
We’ve discussed how leading lines can naturally direct the viewer through an image. And how S-curves help highlight elements placed along its curves. These tools are effective when used in the foreground of an image.
Another way to emphasize your focal point is including a second frame in your foreground.
For instance, you may take the image through a window, door, or a natural frame like parallel trees. This framing method is generally referred to as “frame within a frame.” When used correctly, this method can successfully arrest your viewer’s attention on your focal point.
Frame within a frame is especially helpful in wide scenes such as landscapes. They help
structure the image to prevent the viewer from wandering loosely around the frame.
Consider foreground elements to improve your compositions while you’re out with your camera. Keep your focal point in mind, then look for curves, lines, and frames to focus the image.
Resource: Make Your Images Look 3D With These 10 Techniques
18. Capture Motion

Capturing motion is one of the most attractive features in landscape photography. Motion adds texture, drama, and contributes to the overall impression of most landscape scenes.
As mentioned, to achieve motion in a photograph, you’ll need to utilize slower shutter speeds.
Doing so will allow your sensor to record the sweeping white movement of a wave or the dissipating clouds in the sky.
When your capturing motion, use manual or shutter priority mode. Both of these settings will give you full control of how long your shutter will stay open.
This is important as different scenes will require different shutter speeds to record motion effectively.
For example, different forms of water will require different shutter speeds to capture their movement.
A small, delicate waterfall will require slower shutter speeds than a rapid waterfall.
Forest streams and ocean waves will need two different shutter speeds for the best photographic results.
To capture the movement of clouds, the shutter speed will depend on the speed at which the clouds are moving. Clouds that are moving slower will need slower shutter speeds compared to clouds that are moving quickly.
When trying to photograph movement, remember to bring an ND filter with you. This will enable you to use a prolonged shutter speed without overexposing your images.
Finally, remember to bring a tripod. If you attempt long exposure photography while shooting handheld, you’ll end up with a blurred scene.
Resource: How to Photograph Water: The Ultimate Guide
19. Use Reflections
Reflections are one of the most popular visual elements in landscape images. And rightfully so.
Reflections have a mysterious and enchanting quality. They open up our imaginations and inspire us to think beyond the mundane. As such, reflections are a go-to subject for photographers seeking to spellbind their audience.
The beach is one of my favorite subjects to photograph for reflections. You can find rippled reflections in the ebbing tide as clear reflections in shallow pools of water by the shore.
When capturing reflections, consider focusing on the reflection itself. Focusing on the surface instead of the actual reflection can cause you to lose clarity in the resulting image.
Also, remember to play around with different perspectives. The resulting image shot at a high angle will be a lot different from one shot from a low angle.
If you want clear, sharp images of reflection, stay away from the wind. Wind and breeze usually come after sunrise, so shooting early in the morning is a great choice.
Finally, when photographing reflections, let go of reality. Instead, opt for a dreamy, mystical representation of the world.
20. Close Crop on Textures
Spontaneous occurrences happen in nature all the time, many of which we never even realize.
These small and random events provide endless opportunities for unique photography.
So, when you’re out in the natural world capturing sweeping landscapes, don’t ignore the minute details.
Zoom in on your subject with either your camera or with your feet. Try a close crop on a subject, whether it be a leaf, insect, tree bark, or stone.
When you look closer, you’ll find mesmerizing details that you never noticed before. This special eye for detail is what sets nature photographers apart from other types of professionals.
To best capture detail, use a lens with adequate zoom, ideally over 50mm. But, if you want to dive deeper, purchase a macro lens.
This type of lens has an incredible capacity to magnify the smallest of details. But, know that a macro lens isn’t a necessity for striking photography. As long as you have a way to get in close and capture detail, you’ll be well on your way.
21. Use Different Angles and Perspectives to Stand Out
Sometimes, all it takes to bring your composition to the next level is a fresh perspective.
Finding a new perspective may mean finding a new vantage point to shoot from. Stand on a platform or get down on the ground to alter the height that your shooting at.
With a slight shift in perspective, you can completely transform your subject and the overall aesthetic of your image.
So, take time to explore the options available to you with any new subject. Don’t rest until you’ve exhausted every angle. When you try out new viewpoints and investigate your environment, you can be sure to discover something special.
22. Include People in the Shot

Incorporating people into your landscape scenes is a great way to give your images an edge.
For one, having a human figure in the shot is a great way to illustrate the expanse of the landscape. It gives your audience a benchmark for the relative sizes of the elements within an image.
Having people in your landscape shot also adds a layer of emotion to the tone of your photo. It allows your audience to connect and reflect on the picture more deeply.
We all have a natural connection with other human beings. Seeing a person standing in the midst of a vast, beautiful landscape is a great way to mentally transport your viewers to the scene. It will give them a sense of escape and a feeling of adventure.
To add inspiration to your shot, you’ll want to capture the person in a candid moment.
This natural position will make your image more relatable to the viewer. It will also help create an underlying story for your image.
If you can’t capture your subjects in motion, try capturing them in dynamic poses.
You can do this by emphasizing the space between the person’s body parts. Also, be thoughtful of how you position your subject’s arms and legs. Doing so is one of the best ways to give the illusion of movement when there is none.
If you can’t find anyone to photograph, consider including yourself in the shot. As with most types of self-portraits, you can use a timer and a tripod for this.
Finally, when including a person in your landscape image, keep the rule of thirds in mind — experiment with positioning the figure off-center in the shot.
Resource: 20 Ways to Tell a Story With a Single Image
23. Consider the Sky
In most landscape photographs, the sky has a large impact on the overall composition.
Sometimes the sky in your shot appear empty or lacking in color. If so, make the foreground dominate the image’s composition. You can do this by positioning the horizon at the top third of the composition. If you are using the rule of thirds, this would be the horizontal line closest to the top of the frame.
Conversely, if your sky is striking, with whirling clouds or vivid colors, lower the horizon so that the sky becomes a focal point. In this case, you may want to make the foreground less elaborate. Although it certainly doesn’t have to be.
Another option to enhance the sky is to use filters, such as a polarizing filter, to adjust color and contrast. You may also want to highlight the sky in an image with post-production.
With thought and attentiveness, the sky can significantly improve the visual quality of your image.
24. Work with the Weather
As a landscape photographer, you’ll need the weather to be on your side. The weather has a huge impact on the mood, tone, and even subject matter in a shot.
So, strategically selecting when and what to shoot based on weather will greatly work to your advantage.
Don’t make a mistake in assuming that a sunny day is a perfect time to shoot landscapes. Most often, stormy days are the ones that lead to stunning images.
Also, pay attention to fog, wind, rainbows. All of these elements can help supplement the mood and tone of your images. They will present a greater variety of photographic opportunities than your average sunny day.
25. Play with Light at Night
Photographic opportunities don’t vanish when the sun goes down. Pick up a flashlight or headlamp and head out with your camera at night.
Using a flashlight, you can paint the foreground of your landscape with light, while using the stars as your backdrop.
You can also include a human subject with a headlamp in your shot to make it more inspiring. The headlamp can illuminate the surrounding landscape, or the beam itself can be the image’s focal point.
For a fun light trick, position a strong light source in a tent at night and snap photos. The location of the tent can be anywhere, from a calm beach to a precarious mountain cliff.
26. Capture Different Seasons
Landscapes sceneries can change drastically depending on the season. From the color of the leaves to the quality of ambient lighting, each season offers a unique look.
During spring, the scene will be bursting with new life and budding flowers. Summer is leafy and green, with nature in full swing. In the fall, the leaves are shifting color and gradually falling. In the winter, the world is icy and chilled.
Make the most out of photographing beautiful landscapes by visiting them in different seasons.
27. Get Out Early and Stay Out Late
Capturing exceptional photographs is all about being present when great natural lighting hits.
The blue hour and the golden hour is often the ideal time to shoot.
The blue hour happens right before sunrise and right after the sunsets. The remnants of the sun cast a beautiful warm tint at the horizon, while a cool vivid blue dominates the sky.
The golden hour happens at sunrise and sunset. The low angle of the sun during this time brings a beautiful soft golden light over your subject.
The golden hour happens fast, so you’ll need to be efficient with your time. Plan your location ahead of time to boost your chance for success.
To experience quality light, get outside early and stay out late. Otherwise, you’ll miss these periods of perfect natural lighting that creates spectacular landscape scenes.
28. Make Time to Scout the Location
Acquainting yourself with your new shooting location is one of the first steps in creating successful landscape images.
You may likely be visiting a location that’s been shot several times before – the time you take to learn about the area will enable you to be unique. It will allow you to find new angles, consider new perspectives, and think about what hasn’t yet been done.
I recommend using the midday hours to familiarize yourself with a location. Save early mornings and late evening for shooting, since the light will be ideal at these times.
29. Chase The Light
The ever-changing quality of light throughout the day can have a drastic impact on your subjects.
A sun poking through the clouds mid-day will have a drastically different effect on your landscape scene from the light at sunset.
With the sun’s movement across the sky come shifts in the color of natural light. It changes from cool blue tones to fiery reds.
You can utilize this natural phenomenon to experiment with various tints on your subject.
You can also use light to direct the tone of your image. A bright, sunny sky seems joyful or celebratory. A gloomy, cloudy day seem melancholy and mysterious.
When you head out to shoot, consider the tone of the light. Is it cool, soft, warm, or intense? You can change the viewer’s impression of an image by utilizing the quality of the natural light in a shot.
Shadows are another light element to consider while shooting. Shadows create contrast, which,
in combination with the quality of natural light, will impact the feeling that a viewer gets when they look at your image.
30. Look Up!
It’s all too easy to get caught up in what’s right in front of us. But, when you take a moment to see the whole picture, you’ll find an expanse of new opportunities.
When you look up, you may find breathtaking cloud formations. Or you may find a pattern of tree leaves that works excellent for abstract images.
Remember, the world above us, not just in front of us, can bring you plenty of photographic opportunities.
31. Break The Rules
The world of photography sets out guidelines and theories. But, you still have the freedom to experiment, so don’t be afraid to do so!
With the invention of digital photography, photographers gained the ability to experiment without worrying about wasting their negative. Today, you don’t have to worry about wasting your negative by trying something that’s never done before.
So, go against the grain, break the rules, explore your personal style. Not every shot will be successful, but the ones that are certain to be memorable.
Bonus: Be Patient
In nature, you always run the risk of circumstances beyond your control ruining your image.
It doesn’t matter how much preparation you have done, nothing can guarantee that you will get that perfect sunset you want.
But one thing that is within your control is your ability to stay patient.
Sometimes, the most incredible scene will appear as you drive away. The feeling of loss will be frustrating, and your head may swim with “what if”s.
So, put hastiness aside when you shoot. You’ve already committed to picking up the camera, so stay as late in the scene as you can. Practice patience, and you won’t be disappointed.
Conclusion
While a gorgeous scene puts your photography at an advantage, there are numerous strategies that you can use to enhance each shot.
Proper gear, strategic timing, preparation, and patience are just a few examples of how you can soar in landscape photography.
Never settle to simply fix issues in post-processing. Strive to achieve a balanced composition on the first shot.
Remember to keep learning and never stop practicing, and your well on your way to mastering landscape photography.