Photographing silhouettes is a great way to convey emotion and infuse drama in your images. For instance, taking an image of a silhouette during sunset often draws the viewers into the photograph, feeling what the subject may have been feeling at the time.
If you’re just starting out with silhouette photography, here are some tips to help you create a photo that your viewers will love:
1. Face the Light
When taking silhouettes point your camera at the light source.
Doing so creates an effect similar to how the moon appears during a solar eclipse. This effect is known as backlighting.

When the moon comes between the sun and the earth, it appears black. But, you can see the sun’s light emanating from behind outlining its edges.
This is the same effect that you’ll see with backlighting. Your subject will appear dark with a subtle glow outlining it. This type of lighting usually provides a visually stunning and dramatic effect.
2. Choose a Strong Subject

While you can create a silhouette with any object, some subjects are more visually appealing than others.
You should choose a subject that viewers will recognize the outline of.
If you create a silhouette where the viewer can’t tell what is being outlined or isn’t stimulating in a two-dimensional form, then it won’t hold their attention.
Since you can’t rely on contrast, texture, or tones to keep the attention of your viewers, you’ll have to choose something that has a distinct shape.
3. Make Shapes Distinct and Uncluttered

If you have multiple subjects in your photograph, don’t let them overlap.
For example, if you’re photographing two camels in a desert, you won’t want them to be overlapping each other.
If they are too close together, they will be combined into one shape, and the outline may be unrecognizable to your viewers.
When photographing people as your subject, it may also be better to photograph them in profile rather than facing them directly.
Photographing in profile enables the viewer to appreciate more of their features, like their noses and mouths, since they are more prominently outlined.
You should also pay close attention to the placement of their arms and legs. Using and creating space between and around your subject’s arms will create a more sharp silhouette.
4. Create Dynamic Poses

There are two ways to photograph people in dynamic positions:
- Photograph people in motion
- Stage dynamic poses
When you photograph people in dynamic positions, they seem to be more involved with their surroundings. This creates a photograph that appears more natural.
When your subjects appear connected with their environment, it can help tell a story to your viewers.
This is especially helpful since backlit images typically lack texture and depth.
If you are unable to photograph your subjects in motion, you should create poses that make them appear as if they were in motion.
To stage dynamic poses create space between the arms and legs of your subject.
You can do this by having your subjects raise or extend their arms, bend their knees, etc.
This will make them appear like they are moving when they aren’t.
6. Expose For Highlights
When you are shooting silhouette photos, it is best to expose for the highlights, even if the rest of the photograph is left dark. Exposing for the highlights allows you to capture as much detail as possible.
Remember, when shooting silhouettes, it’s ok to have some of your highlights a bit overexposed. This is expected, especially around the light source.
7. Which Settings to Use For Silhouettes?

To photograph silhouettes you can either use manual mode or your cameras auto modes.
Note that though I will be discussing both settings here, I would recommend using manual mode when taking photos of silhouettes.
It is one of the few compositions where I almost always shoot in manual mode.
Manual Mode
If your camera has a manual mode, I suggest starting from there.
Being able to choose the settings for your aperture, shutter speed, and ISO manually is ideal for shooting silhouette photographs. Here are some recommendations:
Shutter Speed: Use a fast shutter speed.
Shooting silhouette means you are photographing against bright light. To prevent your image from being overexposed photograph at faster shutter speeds.
The faster your shutter speed, the less time your shutter is open, which means that less light will reach your sensor.
Fast shutter speeds also come in handy when you’re shooting a subject in motion. The faster your shutter speed, the less movement is captured while you’re taking the picture.
This can be useful if you decide to photograph people moving rather than in dynamic poses.
To maximize the sharpness of your photo, you can set your shutter speed to the fastest possible setting.
If you’re photographing a subject in motion, you can start at 1/250 and go up to darken the photo as needed.
Aperture: Use a small aperture or high f/stop (f/8 or higher).
This is advantageous for two reasons.
First, it will decrease the amount of light that enters your lens, which is especially useful if you’re using the sun as your light source.
Second, it will help to keep your photograph (both foreground and background) focused since you’ll have a larger depth of field.
ISO: Keep your ISO as low as possible.
If you’re finding that your photos have too much grain or noise it could be because your ISO is too high.
It’s okay to have it slightly raised in darker environments, but you’ll get clearer pictures if you put your ISO as low as possible.
Automatic Mode
You can use program, shutter and aperture priority to photograph a silhouette.
Use program mode if you want to capture a picture quickly without having to adjust any of your settings. Program mode will only give you control over your ISO and will automatically adjust the shutter speed and aperture.
Aperture priority gives you control over your aperture and ISO and lets the camera choose the shutter speed. Use aperture priority if you want control over the overall focus in your image. For instance, if you want your foreground and background to be in focus.
Use shutter speed if you want to control how motion is captured in your image. Shutter priority gives you control over the shutter speed and ISO while letting your camera adjust the aperture.
How To Shoot in Auto Mode?
In auto modes, your camera uses its built-in light meter to determine the proper exposure for your photos.
This metering averages the exposure from your entire photo, to figure out how to set their exposure settings.
However, photographing silhouettes can make this difficult. Averaging exposure across a whole image means that every element in the photo will be given the same weight.
While this should work for pictures with an even amount of lighting throughout, it doesn’t work so well for images that have higher contrasts.
Since backlighting gives your photograph higher contrasts, the exposure will most likely be improperly measured.
As such, when using auto modes, you’ll need to trick your camera into producing a silhouette.
To do this, you need to focus on a bright or overexposed area within your frame.
When you meter against a bright portion of an image, your camera will adjust your settings to reduce the exposure.
When done correctly, you’ll be successful in capturing a silhouette.
8. Use Metering When Using Auto Modes
Most cameras have three metering modes: matrix, spot, and center-weighted. Typically, matrix mode is the default setting used by most cameras.
Matrix Metering

This mode will take the entire frame into consideration when adjusting for proper exposure.
To trick your camera when using matrix mode, you’ll want to start out by pointing your camera at the brightest spot in your scene.
This may require you to temporarily recompose your frame.
Since the matrix mode weighs exposure across the entire frame, make sure the majority of your frame contains highlights.
Once you’ve focused on the brightest part of your scene, push the shutter button down halfway. Your digital camera should take that time to adjust exposure levels of your photo.
Once your camera has adjusted its exposure, go back to your original composition while you’re holding the shutter button down halfway.
Finish pressing your shutter button to capture the image. This should produce an image with a silhouette.
Center-Weighted Metering
The center-weighted metering mode will place more weight at the center of the frame when adjusting for proper exposure.
This means that to trick your camera, only the center of your frame has to be bright.
Typically, as long as the center of your frame consists of highlights when you press the shutter halfway down, you can produce an image with a silhouette.
Spot Metering

Finally, there is spot metering, spot metering will only consider a small “spot” or area when adjusting for proper exposure.
The area of your photo that it treats as the “spot” is the location of your focus point.
In my opinion, spot metering is the easiest mode to use when trying to capture a silhouette. It provides the most flexibility in terms of composition.
To use spot metering, move your focus point to the brightest area of your frame and press the shutter button halfway down. Then you can readjust your focus and take your image.
9. Exposure Compensation

If you are having trouble producing an image that is dark enough to create a silhouette, you may need to adjust your exposure compensation.
The exposure compensation lets you adjust up to five stops of light in your scene without physically altering your exposure settings.
When trying to capture a silhouette, you will need to reduce your exposure compensation to a value between negative one and negative three. The smaller your exposure compensation, the darker your images will become.
If you are interested in learning more about exposure compensation, read this article.
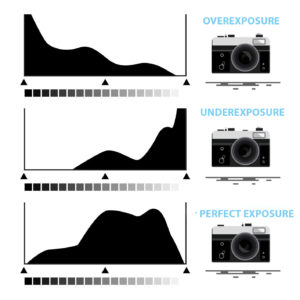
10. Use Histogram
 Some photographers use evaluative metering, which averages the exposure from your entire photo, to figure out how to set their exposure settings.
However, as mentioned, this may not be the best option with silhouette photography.
Since silhouette photographs have higher contrasts, using evaluative metering will most likely give you an improper measurement.
Thus, you might be better off trying to set your exposure by reading your histogram.
This process does take more time than evaluative metering, but you’ll likely get a more accurate result and be better able to measure the exposure of your photo.
The type of photography that you’re shooting will affect how your histogram is going to look.
Photos that have lots of detail will give you a histogram made up of lots of mid-tones and highlights.
However, a composition that has fewer details will result in a histogram filled with mostly shadows.
11. Adjust Your Focus
When you’re photographing silhouettes, you’ll most likely want your focus to be on the subject.
Your camera’s manual focus might be able to accomplish this all on its own.
But, to minimize the risk of having a blurry image, consider utilizing your camera’s autofocus.
These modes can be particularly important in conditions where light keeps changing. In such instances, you may realize that going manual only serves to slow you down.
12. Consider Partial Silhouettes

Many silhouette photographs have the subject of the photo completely dark with a clear outline to them.
But, exposing your subject to a little bit of light means your viewer will still be able to see part of the subject, enhancing their three-dimensionality.
There are two common ways to create partial silhouettes: manual and automatic bracketing.
Manual
One way to do it is to take two different images–one will be to exposed for the highlights and the other for the shadows.
This can be done using the manual, shutter, or aperture priority mode.
To do this successfully, consider using a tripod. Doing so will allow you to blend the two images seamlessly in post-processing.
Automatic Exposure Bracketing (AEB)
Another way to take multiple exposures is to use the Automatic Exposure Bracketing (AEB) in your camera.
Most cameras will allow you to adjust the number of shots you take when using AEB. The number of shots will determine how many underexposed and overexposed images you’ll have.
For instance, a three-shot AEB will shoot one underexposed, one overexposed, and one properly exposed image. Similarly, a five-shot AEB will shoot two underexposed, two overexposed, and one properly exposed image.
You can also adjust the number of stops you want for exposure.
For example, if you set your camera to take three images (three-shot AEB) and you bracket for two stops of exposure, your camera will capture one image that is two stops overexposed, one image that is two stops underexposed, and one properly exposed image.

Whether you decide to use manual or automatic bracketing, you will need to blend the images in post-processing. There are two ways you can do this.
The first one is to use HDR software. This software will automatically blend your images for you.
The second is by doing it manually. To blend images manually you need to select the elements you want from each photo and combine them into one picture.
I prefer to do it manually as it allows me to have more control.
Either way, this technique will enable you to create an image with every element adequately exposed.
13. Consider Adding a Sunburst
Including sunbursts within your frame can help your photo stand out.
To add a sunburst in your image, set your aperture to a higher number, like f/16 or f/22.
Choosing a higher f-stop will make the aperture opening narrower, which results in the light bending around the aperture blade when coming through the lens of your camera.
This creates the “star” appearance of a sunburst.
Something to keep in mind, the appearance of a sunburst is dependent on the build of your lens.
The number of rays in your sunburst will be the same as the number of aperture blades that your camera lens has.

If your lens has an even number of aperture blades, the sunburst will have the same amount of rays. However, if your lens has an odd number of aperture blades, the sunburst will have double the number of rays.
To enhance your sunburst, consider partially blocking your light source. Having the light source partially blocked enhances the appearance of the sunburst because it diffracts the light before it even goes through your camera lens.
When trying to create a sunburst, try different angles. A slight variation in your composition can have a significant effect on the outcome of the appearance of the sunburst.
Finally, make sure that there is no dust on your sensor since these aperture settings make dust stand out more.
14. Adjust Your White Balance
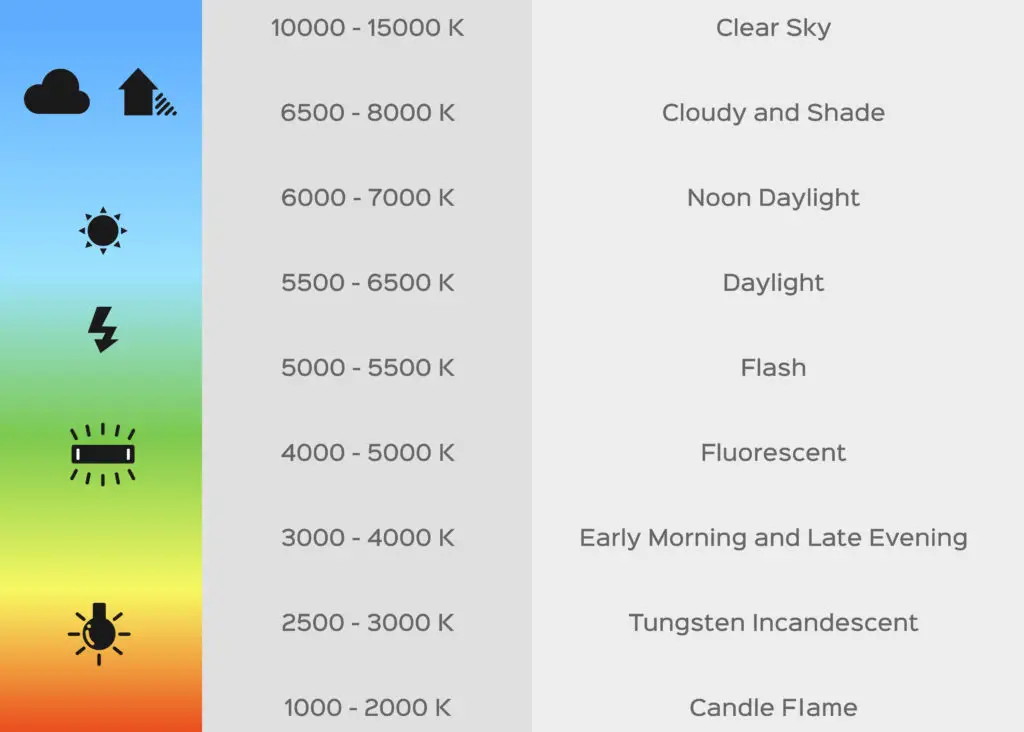
The colors in your photographs can be affected by the temperature of your light source. Light sources that give off warm light will give your photos a red-orange tint, while light sources that give off cool light will give your photos a blue tint.
Since you’ll be photographing directly against the sunlight for silhouette photography, you may end up red-orange tint to your photos.
Use the white balance settings of your camera to adjust the color in your photo. White balance helps you tweak the colors in your photographs, so they appear more like the colors do in person.
When you’re shooting with warmer light sources like the sun, you can adjust your white balance settings to cancel the red-orange tint out with a blue tint.
And if you’re using a light source with cooler light, you can adjust your white balance settings to cancel the blue tint out with a red-orange tint.
There are 3 main types of white balance modes that can be used to adjust the colors of your photograph:
Automatic White Balance (AWB)
This mode is an automatic setting that lets your camera make adjustments for you based on the source of light in your photo.
However, sometimes these adjustments aren’t quite what you want, and there are some additional settings you can change to make sure your camera is making the best possible recommendations for white balance. These modes include daytime, cloudy, shade, fluorescent, and tungsten.
Kelvin Mode
These manual settings allow you to make adjustments to your white balance settings yourself. With this mode, you have to enter the temperature of your light source on a Kelvin scale. While it can be hard to measure the temperature of your light source, there are apps you can download on your phone that can measure the temperature for you.
Custom Mode
With custom mode, you can choose an element in your photograph to base the white balance settings off of. Photographers generally use gray cards for this purpose, placing them in the picture to use them as a point of reference. Your camera can then make adjustments to your white balance and the colors in your photo.
White balance settings can be used both to correct the colors in your photo or add an extra touch of creativity.
15. Watch Out for Lens Flare

Backlighting can provide a few different obstacles, but lens flare is one of the most common.
Lens flare occurs when light hits the lens straight on.
Since taking photos of silhouettes requires the camera to face the light source, lens flare is often a problem.
Some photographers may like to use lens flares in their photos, depending on their goals, but many photographers try to avoid them.
Lens flares can often cause discoloration and improper contrast, which can result in an unappealing photo. Sometimes, they can even ruin a photo entirely.
16. Use a Lens Hood
One of the best ways to make sure you’re avoiding lens flares is to use a lens hood.
This is the equivalent of wearing a baseball cap to block the sun from your eyes.
If you don’t have a lens hood, consider using your hand or an object such as your cap to shield your lens from the light.
If you plan to use your hand to block the light, consider using a tripod. Doing so will enable you to use one hand to press the shutter button and the other to cover the lens.
To do this, set your camera up on the tripod and look into your camera’s viewfinder to find the lens flare. Once you’ve located the flare, experiment with the position of your hand until the lens flare is gone.
If you find that your hand blocks part of the photo while trying to prevent the lens flare, you have two options.
The first is to take two different shots: one with the lens flare, and one with your hand in the shot. Then blend them in post-processing.
The second option is to recompose so the lens flare disappears from the frame.
17. Filter the Sun
Filtering the sunlight is another good way to avoid lens flares.
Shading your camera will help decrease the chances of lens flares by decreasing the intensity of the sunlight.
One of the easiest ways to filter the sun in your photos is by using trees.
Trees effectively block the sun, while still allowing some of the light through. This way, you can still use backlighting with the light that manages to breakthrough.
Just be sure that if you use this method that you’re not entirely blocking out all of the light. You still want some light to come through to illuminate your subject and the surroundings.
In addition to minimizing flares, filtering the sunlight with trees is also an excellent strategy for infusing mood in your images.
18. Keep Your Lens Clean
When you’re taking silhouette pictures facing a source of light, keeping your lens clean is essential. This is because the position of the light source makes it easier to see dust and other imperfections in your photos.
Backlighting will make it easier to see things like dust, fingerprints, streaks, and anything else that may be on your lens.
Taking a few seconds to clean your lens can save you a tremendous amount of time.
Conclusion
Silhouette photography can make for a great keepsake. And these photos can be easier to take than most people think.
As long as you follow a few key strategies, such as backlighting and making sure your camera’s settings are optimized for silhouettes, you’ll be on your way to creating beautiful silhouette photos.