Timing your outdoor shoots can be inconvenient. But, it can’t be ignored if you want your shoot to be successful.
Unlike shooting indoors, outdoor lighting is outside your control. No matter how much you plan, there is no guarantee that you’re going to get the light that you want.
Despite that, there are still things within your control that can make all the difference. One of which is how much you prepare.
By learning about the best times to photograph outdoors, you’ll increase the chances of your photoshoot’s success.
To help, I created a list of the best times to shoot outdoors in any season.
Let’s dive in.
What’s The Best Time To Take Pictures Outside?
The Short Answer: Generally, the best time to take outdoor landscape and architecture photos is around and during sunset and sunrise. In portrait photography, outdoor shots are best taken just following the sunrise and slightly before the sunset.
What’s The Best Time to Shoot Landscape Photography?
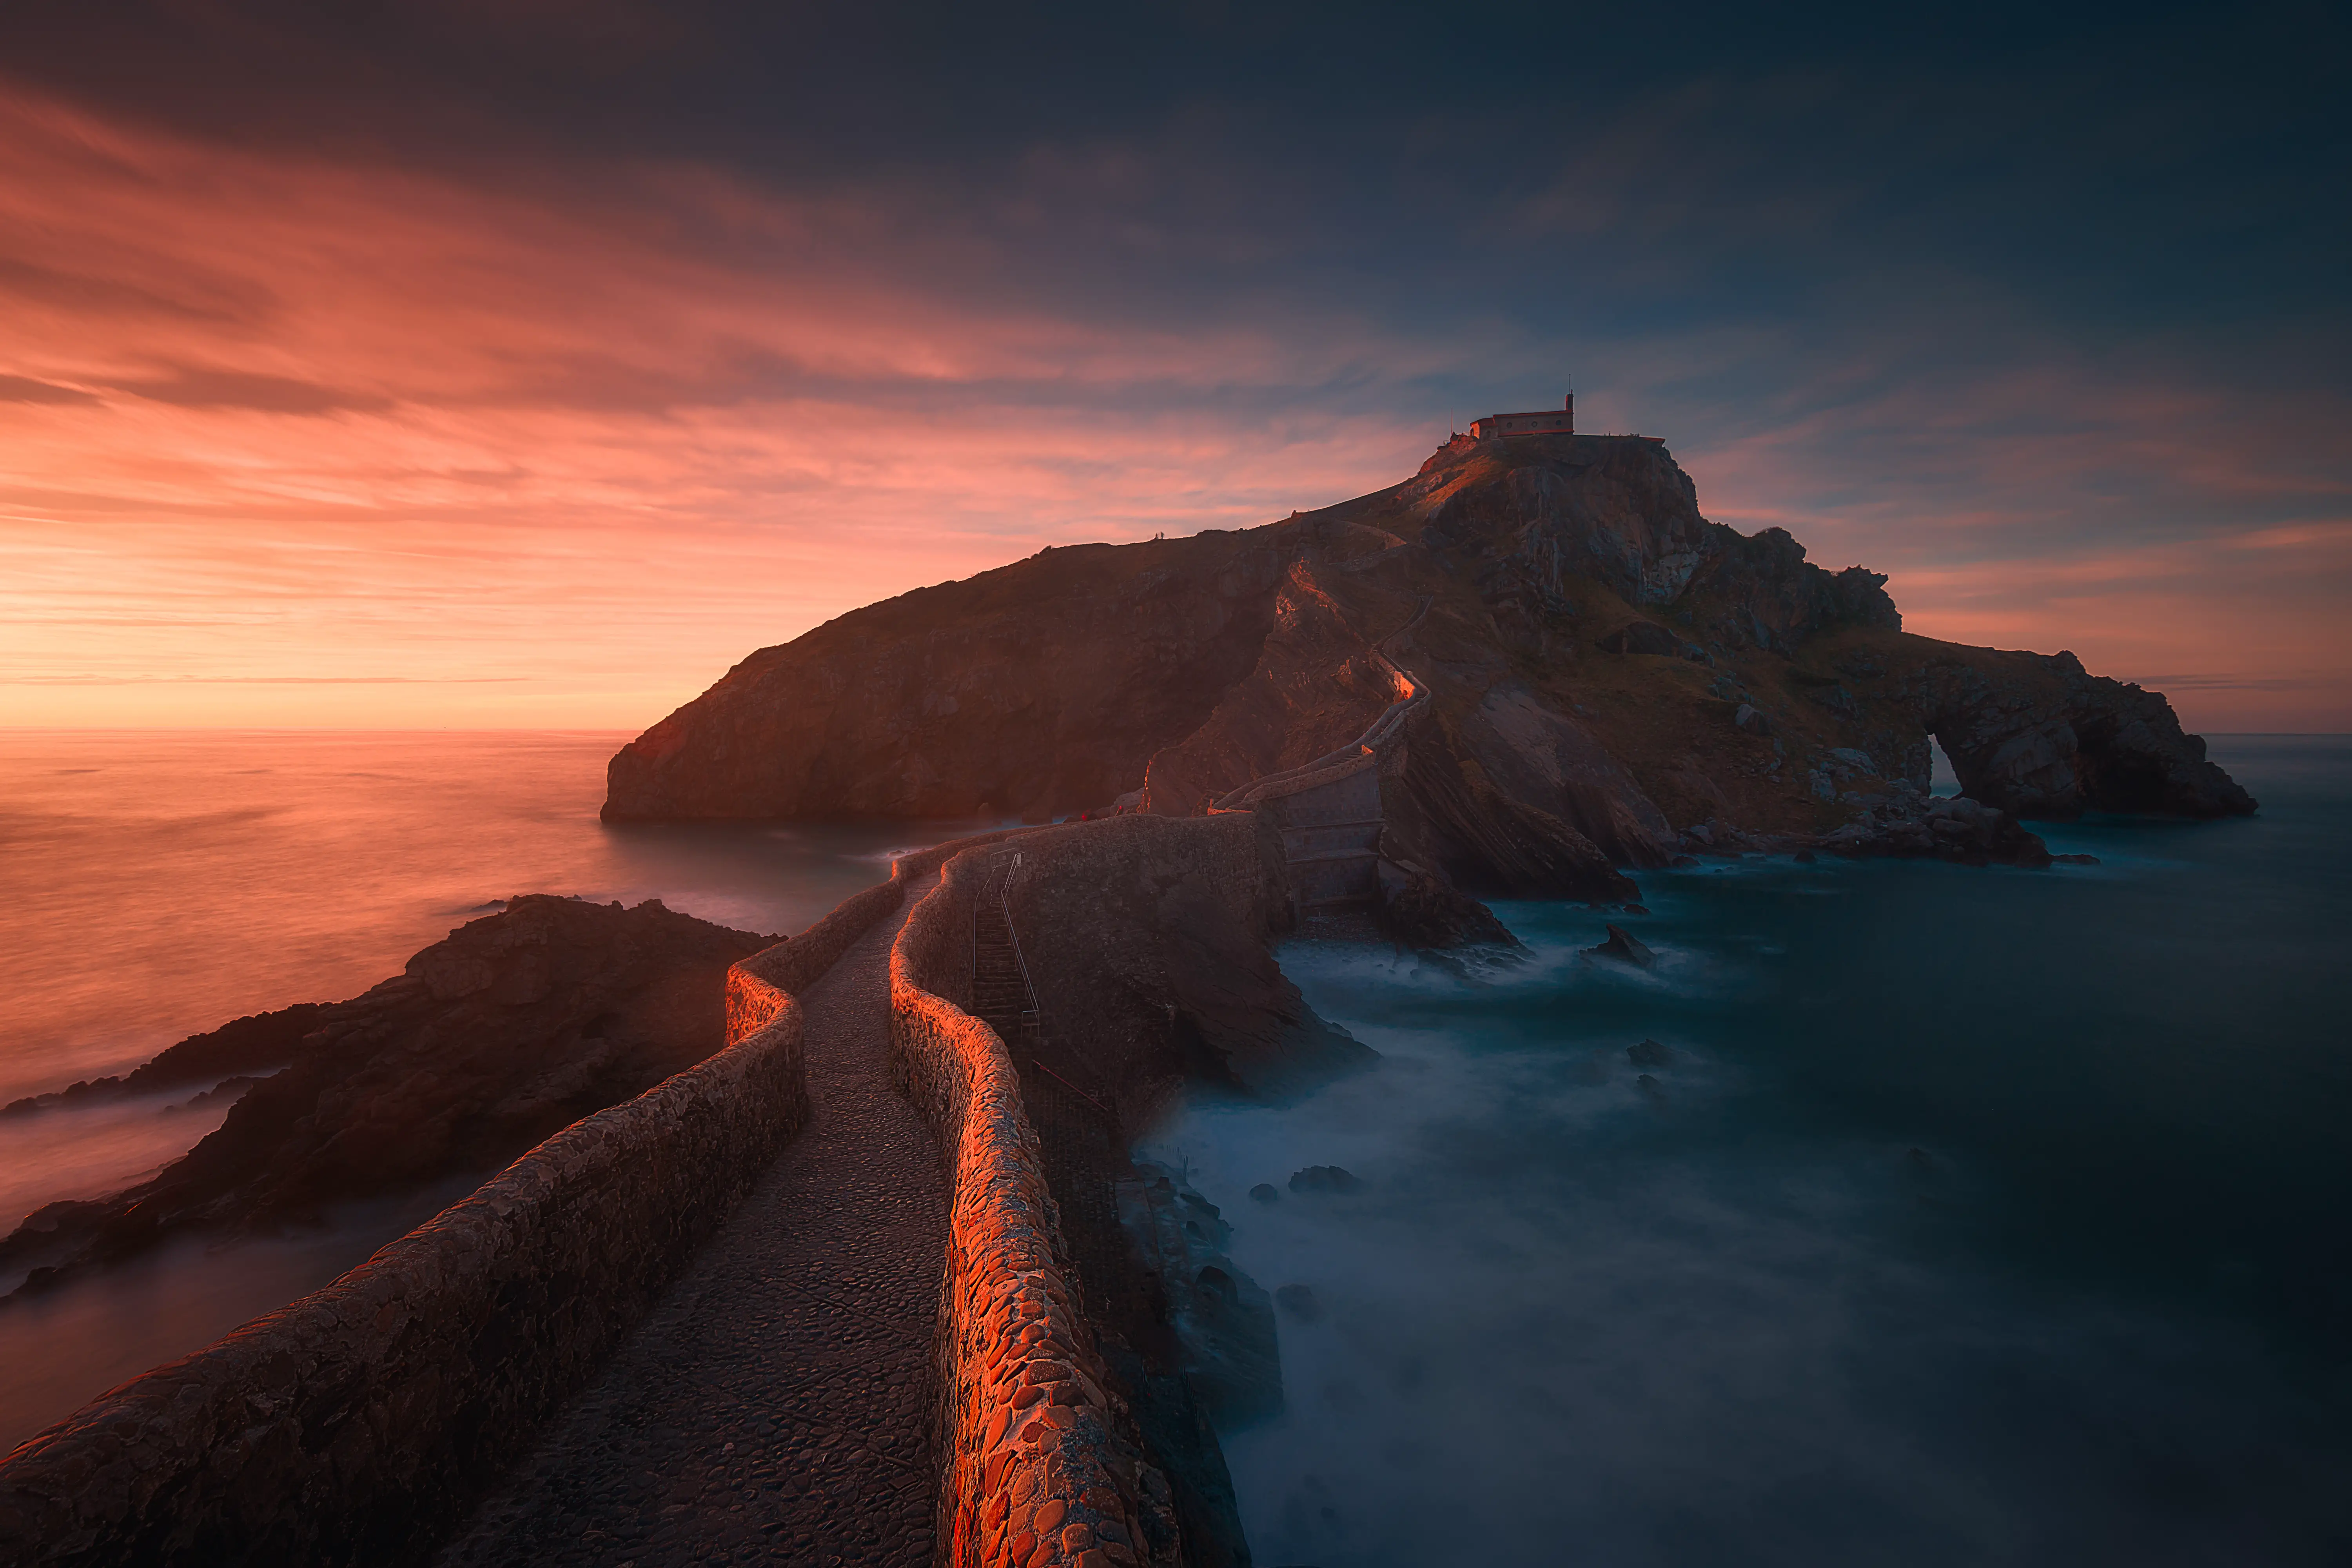
Usually, the quintessential time of day for landscape photography is during the “magic hours.” The magic hours is the combination of the golden and blue hour.
The golden hour takes place two times a day: at sunrise and at sunset.
The blue hours are also known as civil twilight. Civil twilight occurs when the sun is 6 degrees below the horizon.
This typically occurs immediately before sunrise and after sunset.
The Golden Hour
During the golden hour, the sky casts a warm, red-orange glow, ideal for taking landscape images.
Also since the sun is at a lower position, the lighting contrast around this time is less intense.
The low angle of light softens the shadows, creating a flattering visual effect.
Further, the disparity separating highlights and shadows is the most apparent during this time.
This helps to accentuate the depth and form of landscape scenes.
Shooting landscapes during the golden hour helps create a striking tone and aesthetic to landscape images.
The Blue Hour
The blue hour is universally recognized by landscape photographers as one of the most favorable outdoor shooting times.
During the blue hour, you’ll see the sky tinged with cool blue tones.
The ambient light is soft and diffused, which makes for visually pleasing photographs.
The blue hour can be especially excellent in urban settings.
In cities, street lamps, building windows and car lights all work to create an exciting visual effect in photography.
Stormy Weather
In most scenarios, stormy weather causes much frustration and disappointment for people.
No one wants the clouds to roll in during their day at the beach, or while wandering a city on vacation.
But, the story is a bit different for landscape photographers.
Storm clouds present an excellent opportunity to capture intense and dramatic landscape shots.
The ambient light during a storm is known for its striking colors and tones.
As a photographer, keep an eye on the weather and never miss an opportunity to photograph in stormy weather.
What’s The Best Time to Take Portraits Outside?
The optimal time of day for shooting portraits outdoors is a few hours following sunrise, then a few hours before sunset.
Why Not Shoot During the Golden Hour?
Aim to shoot in the hours after sunrise and hours preceding the sunsets.
These are the ideal times for lighting; not during the golden hours themselves.
The golden hour can lead to beautiful portraits, but it’s generally your best bet to aim for the time right before it starts and right after it ends. Here’s why:
1. Light quickly shifts during the golden hour.
The light during the golden hour is transient. This means to photograph in the golden hour, you’ll have to change your settings constantly.
This eats up time and shifts your focus entirely to technical details, making it difficult to express any artistry.
When the sun is positioned slightly further up in the sky, the light will still have a beautiful, soft quality.
However, unlike the golden hour, it will have greater consistency.
2. You may run out of time.
The golden hour happens within a short window of time.
As a result, a photographer would need to execute perfectly to not run out of time while taking photos.
If you choose the golden hour that happens in the morning, you’ll have daylight left to shoot in.
But, in the evening, you’ll likely have to pack and go home, especially if you were shooting portraits.
3. Fill light may be difficult to attain.
During the golden hour, less light will be available to illuminate the shadows on your subject’s face.
To offset this issue, you can use a reflector. But, this tool is easier to use successfully when the sun is higher in the sky.
I recommend the Neewer 43 inch reflector, it comes 5 different colored covered so you can add the necessary color cast to your scene.
Although, it may seem like a bigger reflector is always better this is not always the case.
Bigger reflectors are harder to handle and cast a wider reflection, smaller reflectors are easier to manage especially if you’re new to using reflectors.
Another way you can add fill light to your images is using a flash. The flash on your camera is not always the best option.
I recommend using an external flash such as the ESDDI camera flash.
This flash is compatible with most DSLR and it has an LCD screen on the front making it easy to use.
4. The color may be too intense.
While vibrant, spectacular sunrises and sunsets are ideal for landscape photography, it’s often not the case in portrait photography.
The bright, saturated colors seen during the golden hour tend to be too overpowering when photographing people.
Vibrant skies, for example, can easily pull attention away from your main subject and dominate a photograph.
While colorful skies are often desired in photography, your subject should always be the most arresting aspect of your photo.
To avoid these issues shoot right before sunrise and immediately after sunset.
At this time, you will still enjoy a soft, warm ambient light without the problems mentioned above.
Plan to complete the bulk of your work in the period surrounding the golden hour, then shoot during the golden hour to capture more intense, unorthodox shots.
This makes for a simpler, stress-free and more successful shooting process.
Overcast Weather
Overcast weather is also a great time to shoot Portrait photographs. The heavy clouds present during this time acts as a natural softbox, diffusing harsh sunlight.
Just think about a cloudy day: shade appears all around us.
Clouds mean that you can shoot throughout the day without having to deal with light that’s too bright or intense.
Remember to make use of the lighting on a cloudy day without including too much of the sky in your frame.
Dull, gray skies tend to be distracting and appear dull in photographs.
What’s the Best Time to Take Pictures Outside in Summer and Spring?

For most images, the best time to shoot during the spring and summer months is in early mornings and late afternoon.
Although for landscape photography, the golden hour is just as ideal.
Midday in the spring and summer produces harsh, overly bright skies.
If you’re shooting portrait when the sun is at its peak, you’ll find that imperfections like dark under-eye shadows and blemishes are more emphasized.
Light is gentler and more moderate early in the morning and late afternoons, making them ideal for photography.
The soft ambient light during this time is perfect for photographing spring flowers.
In fact, I sometimes prefer it to golden hours, even when I am doing landscape photography.
What’s the Best Time to Shoot Outside During Fall Season?

The best time to shoot outside during the fall season is sunrise.
Sunrise provides excellent lighting for fall colors.
In addition, the chilly nights create early morning mist, beautiful for taking photographs.
You can create a dazzling composition with fog over water or dense mist floating in the air.
When you couple these effects with the light cast during the sunrise, you can create a truly remarkable fall image.
Further, on autumn mornings, you may see frost from cold temperatures reached during the night.
You can use this in your sunrise composition to reflect light and color.
Sunsets are also ideal, of course. Combining the golden tones of sunset with vibrant colors of autumn foliage is one of the easiest ways to create beautiful imagery.
While you should take advantage of autumn mornings to shoot, don’t write off the blue hour.
For landscape and city shots, this time can make for eye-catching shots.
Rainy Days
In the autumn months, you may also get several rainy days. This may present you with the chance to photograph rainbows.
Also, wet leaves are more saturated in color than leaves that have dried in the sun.
When you couple wet leaves with soft ambient light, its color will pop and look incredible on camera.
Protect Your Gear
Remember, when you’re putting on rain gear, you’ll need to do the same for my camera gear.
Most importantly, you want to protect your camera and lens.
To do this, you’re going to need a rain cover. Rain covers vary in price.
If you are looking for an inexpensive option that typically won’t last multiple uses.
Inexpensive rain covers typically cost around $9, while others can cost up to $20.
I prefer a more durable option, such as the Ruggard DSLR Parka. It is essentially a parka raincoat for your camera.
It is convenient and easy to use. It features built-in hand warmers, plastic portal over LCD for ease of use, and durable waterproof exterior.
Another thing that people often forget to check is if their camera bag is water-resistant.
Make sure before you shoot in the rain that your camera bag can withstand it.
If your camera bag is not water-resistant, an easy way to overcome this is by using a waterproof cover.
If you already own a camera bag that is not waterproof, consider investing in a waterproof bag cover to protect your gear against the rain.
Keep in mind that waterproof covers don’t offer as much protection as a waterproof bag.
If you are using a waterproof cover, remember to be extra careful around the unprotected areas, especially when you set your bag down.
If you are looking for an inexpensive waterproof camera bag, then Abonnyc DRLBP-CZ is a great option.
It extremely spacious and comes with a customizable interior making it easy to adjust to different situations.
It also comes with a waterproof cover for additional support against heavy rainfall.
If you are willing to invest in a long term backpack, then the Peak Design Backpack is a great option.
This backpack is made with an outer hardcover nylon shell and water-resistant coating.
It is extremely durable and high quality. Also, this backpack has a ton of space and is designed to make using your gear as efficient as possible.
Overcast Weather
Many people wouldn’t guess that cloudy days are ideal for capturing vibrant foliage.
But, overcast lighting is fantastic for capturing the saturation of color in autumn leaves.
When the light is overcast, it can wash away extreme shadows and bright spots, leaving the bright tones and colors to stand out in a way that’s not possible in harsh sunlight.
Also, cloudy days cast cool light with blue tones, which is the ideal counterbalance for the red and orange tones that make autumn foliage special.
What’s the Best Time to Shoot Outside During Winter?
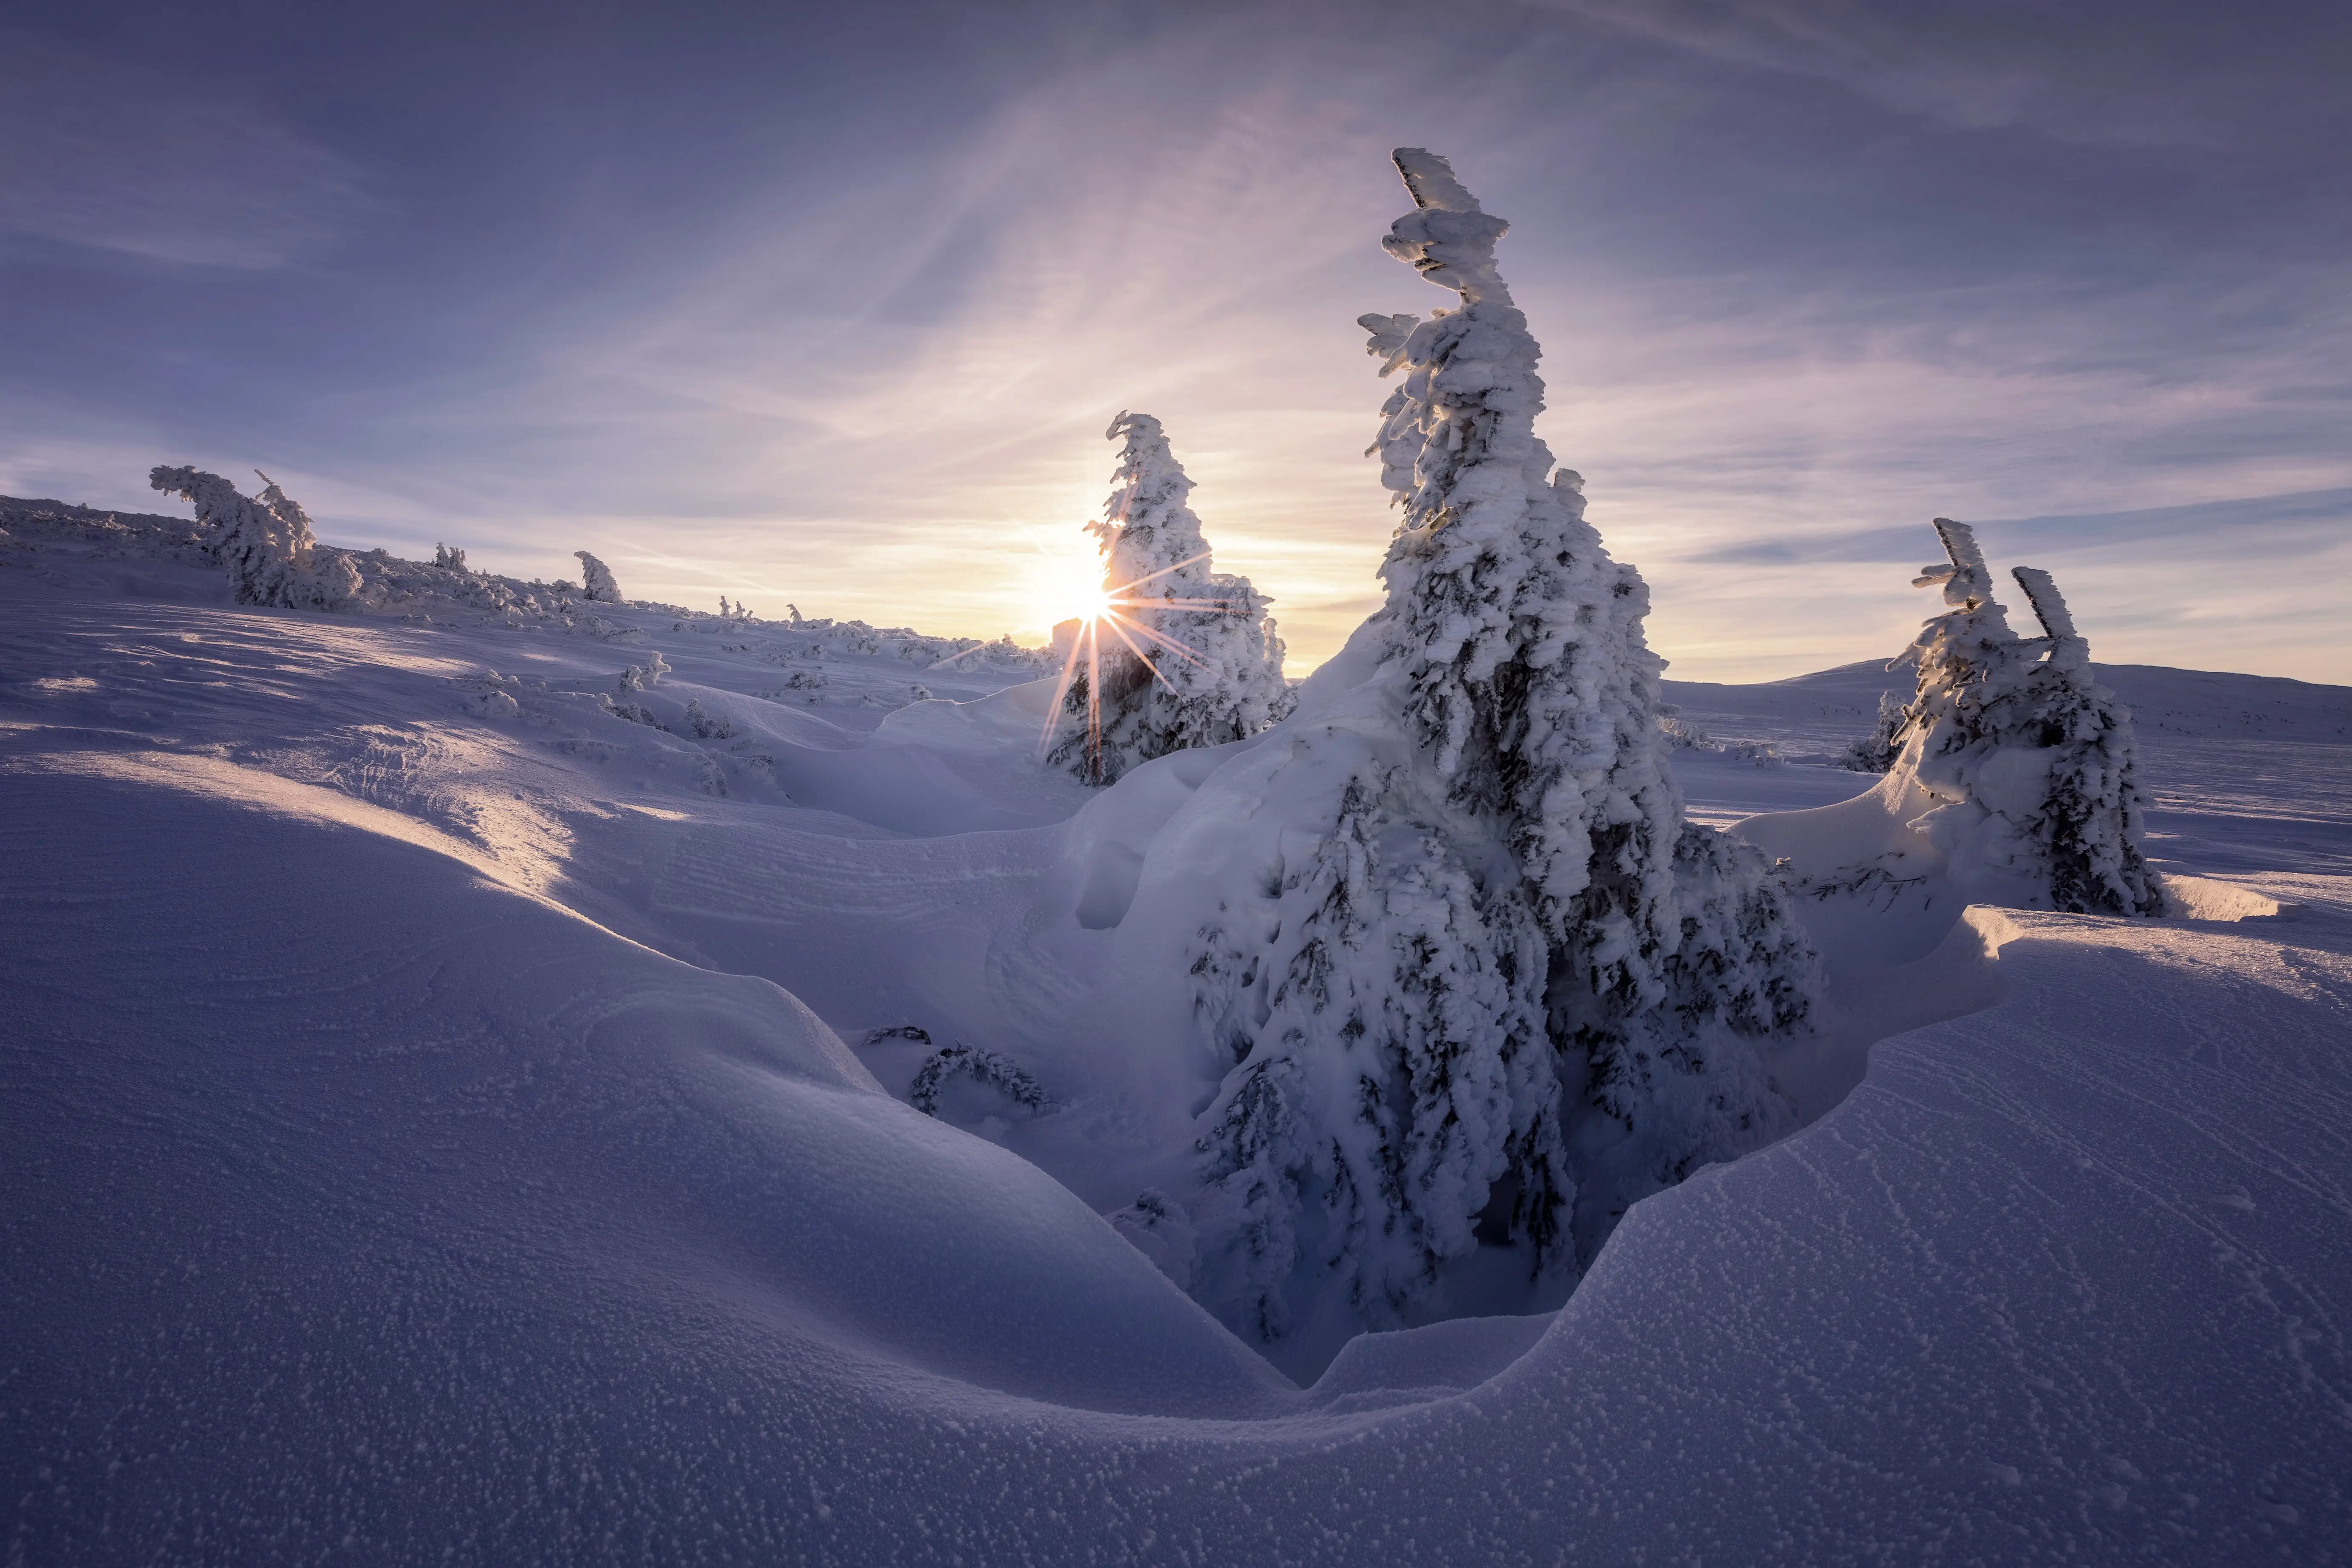
Magic Hours
The magic hours are my top choice to do outdoor photography in the winter.
The sun’s low angle in the sky at this period create a magical effect for snow-topped trees and mountains
That said, during winter, the ambient light can be ideal pretty much throughout the day. At this time of the year, the sun doesn’t reach the highest point in the sky.
As a result, winter produces soft, flattering light for long sections of time in the day.
In contrast to the summer sun, which emits severe shadows, the winter sun gives off soft light for long sections of time in the day.
Nighttime
If you’re lucky enough to live near the Northern Lights or to travel to an area where they occur, don’t miss out on nighttime shoots.
The Northern Lights are simply stunning, and a phenomenon that everyone should witness in their lifetime.
The dancing lights have an unmistakable rhythm and color scheme, creating a musical impact through a visual medium.
When you’re photographing the Northern Lights, don’t forget your warm winter clothing.
You may have to wait a while to see the lights, so be prepared to stand out in the cold.
I recommend layers, beginning with a thermal base. Build the layers to achieve protection from both water and wind.
What to Wear During Winter
Your base layer is crucial to maintaining your body heat.
One of the best materials to use is wool. Consider getting a wool thermal layer.
I highly recommend Minus 33 thermal bottoms and crew tops.
They are of high quality and offer both men and women’s options.
For your middle layer wear slimmer sweaters to keep yourself warm. This will act as additional insulation for your final layer.
Your final layer will heavily depend on the intensity of the weather you are shooting in.
I recommend Patagonia jackets, they offer a wide range of coverage and style to fit every need.
I prefer the Patagonia Insulated Snowshot Jacket, perfect for light to mild weather.
If you are going out during the snow, make sure you bring snow jacket and pants.
A parka jacket is the best option to withstand the harsh winter conditions such as the snow or rain.
Resource: 14 Tips On How to Photograph Northern Lights
What’s the Worst Time to Shoot Outside?
The worst time to shoot portraits and landscape photos outside is midday.
During midday, the sun is located right above our heads and will cast strident shadows and contrast.
You won’t achieve the same ethereal effect available during the magic hour.
How to Calculate the Exact Time to Shoot
The most precise way to determine when to photograph outside is to employ apps or websites that provides sunrise and sunset times.
These virtual tools can also provide exact times for the golden hour.
Here are a few choices:
These apps provide a higher level of detail regarding sunset and sunrise.
You can use them to find the exact time, length, path, and direction of sunrise and sunset for a specific location.
For those only looking to know the minutes and hours in which the sun ascends and descends, you can complete a simple Google search. Or simply consult a virtual assistant like Siri or Alexa.
What Gear Do you Need to Shoot Outside?
Camera
When shooting outside, I recommend you invest in a DSLR or mirrorless camera.
DSLRs and mirrorless cameras give you the ability to shoot in manual, which will allow you to adjust to the quickly changing light outside.
Also, these cameras have an adjustable lens system.
This will give you the ability to change your focal length and maintain your image quality.
Finally, DSLRs and mirrorless cameras produce higher quality images than a compact or smartphone camera.
Below are my recommendations for DSLR or Mirrorless cameras, depending on your budget.
| Model | Type | MP | Budget | Price |
|---|---|---|---|---|
| Nikon D850 | DSLR | 45.7 | High | Check Price |
| Nikon D750 | DSLR | 24.9 | Mid | Check Price |
| Nikon D3500 | DSLR | 24.2 | Low | Check Price |
| Nikon Z7 | Mirrorless | 45.7 | High | Check Price |
| Canon EOS RP | Mirrorless | 26.2 | Mid | Check Price |
| Sony A6100 | Mirrorless | 24 | Low | Check Price |
Lenses
Shooting outside results in a variety of situations. The exact lenses you need will depend on the type of photography you are trying to capture.
There are three lenses you can bring to make sure you have all your basis covered.
1. Wide-Angle Lens
When you are shooting outdoors, having a wide-angle lens is great for capturing the vast scenes.
This will give you the ability to capture multiple elements in your composition. This is often the preferred lens type when capturing landscapes.
Below is a table of my recommended wide angle lenses for different cameras.
| Brand | Focal Length | Maximum Aperture | AF Motor | Price |
|---|---|---|---|---|
| Nikon | 14-24mm | f/2.8 | Yes | Check Price |
| Sigma | 14-24mm | f/2.8 | Yes | Check Price |
| Canon | 11-24mm | f/4 | Yes | Check Price |
| Nikon | 16-35mm | f/4 | Yes | Check Price |
| Canon | 16-35mm | f/2.8 | Yes | Check Price |
| Sigma | 18-35mm | f/1.8 | Yes | Check Price |
| Sony | 16-35mm | f/2.8 | Yes | Check Price |
| Sony | 14-24mm | f/4 | Yes | Check Price |
2. Prime Lens
A prime lens is a great lens to include in your photography if you need an ultra-fast lens for a reasonable price.
They are also typically sharper than zoom lenses since they only have to perfect one focal length.
These lenses are great for portrait photography and night photography.
I highly recommend you bring a 50mm lens, this is a perfect prime lens that can be used in a variety of different situations.
Here is a table of 50mm lenses for different cameras.
| Brand | Maximum Aperture | Minimum Focus Distance | AF Motor | Price |
|---|---|---|---|---|
| Sony | f/1.8 | .45m / 1.15ft | No | Check Price |
| Sony | f/1.4 | .39m / 1.3ft | Yes | Check Price |
| Nikon | f/1.4 | .45m / 1.5ft | No | Check Price |
| Nikon | f/1.8 | .45m / 1.5ft | Yes | Check Price |
| Canon | f/1.4 | .35m / 1.15ft | Yes | Check Price |
| Canon | f/1.8 | .45m / 1.5ft | No | Check Price |
3. Telephoto Lens
Telephoto lenses limit the viewing experience to a small area of a scene.
This creates a more subtle and intimate depiction of the waterfall.
I highly recommend a 70-200mm lens. This lens will allow you to photograph from a distance while capturing detail.
| Brand | Focal Length | Maximum Aperture | AF Motor | Price |
|---|---|---|---|---|
| Nikon | 70-200mm | f/2.8 | Yes | Check Price |
| Canon | 70-200mm | f/2.8 | Yes | Check Price |
| Canon | 70-200mm | f/4 | Yes | Check Price |
| Sigma | 100-400mm | f/5-6.3 | Yes | Check Price |
| Sony | 100-400mm | f/4.5-f.6 | Yes | Check Price |
Tripod
A tripod is a vital tool when photographing outside. A tripod will allow you stabilize your camera and compose your image.
This will make it easier to wait for the proper lighting to set in.
Tripod are also great way to capture different perspectives and angles that would otherwise be difficult shooting handheld.
The Manfrotto Befree series is a great lightweight carbon fiber option that is built extremely well and is not as expensive as other carbon fiber tripods.
This tripod is great for testing different angles. It has a side extending arm that allows you to shoot in any direction and the tripod legs can be extended completely flat allowing it ultimate versatility when composing your image.
ND Filters
ND filters are great for reducing the exposure of your scene without changing your settings.
I recommend a variable ND filter. Variable ND filters allow you to adjust the intensity of your ND filter by twisting the filter.
This is a great way to avoid carrying countless ND filters.
I recommend going with either Tiffen Variable ND or the B+W Pro Digital ND.
Both of these ND filters are built extremely well and offer a variety of different intensity levels and sizes.
CPL Filter
Polarizing filters reduce distracting glare commonly seen on wet objects surrounding the waterfall.
It can also help minimize reflections in the entire image for a clearer, better quality composition.
If you need to purchase a filter, we’d recommend starting with a circular polarizer.
I suggest you use a CPL that allows you to turn and adjust the intensity. I recommend using either the Hoya Pro-1 CPL Filter or the B+W CPL Filter.
Both of these options are easily adjustable and fit an array of different lens sizes. In addition, they both perform exceptionally and cause little to color distortion.
Shutter Release
A remote shutter release can be extremely beneficial when shooting travel and landscape photography.
This is especially true when you have set your camera at low or uneven angles to capture your composition.
It’s also useful for avoiding camera shakes, as well as taking self-portraits.
The Pixel Wireless Shutter Remote is compatible with many different cameras and functions both as a wireless and wired shutter release.
My favorite part about this shutter release is the LCD on the control and 230-foot wireless reach.
Camera Bag
When you’re photographing outdoors it is important that you keep your gear protected from the elements.
One way to do this is to use a weather resistant camera bag that will protect all your gear.
I recommend the Peal Design Everyday Backpack it is a customizable backpack that can fit lots of gear. One of the best things it that it is weather resistant and can even handle heavy rain.
In addition, it has a hard cover shell and padded dividers for added protection for your gear.
Conclusion
Photography is all about chasing the best light. To maximize the probability of successful shoots, it’s important to plan ahead of time.
If you’re struggling to catch the right natural lighting on your own, I highly recommend the apps and virtual tools mentioned in this article.
Finally, always be willing to wake up early and stay out late. This will enable you to take advantage of the best lighting conditions throughout the day.
Always pay attention to the quality of light in all your photoshoots, and you’ll be well on your way to taking remarkable images.
Happy shooting!