Buying used equipment is a great option for saving money, but you have to be careful in your selection. In this post, well talk about the different ways you can find good values and avoid lemons when buying used camera gear.
Downloadable Checklist

Places to Buy Used Camera Gear
1. Check Out Your Local Camera Store
Small local camera stores are great first stops in the search for your used camera.
Compared to larger stores, such as BestBuy or Adorama, local stores are more likely to cut you a discount and offer you great deals on your purchases. This is especially true when buying plenty of gear.
In addition to discounts, local stores also provide a great environment to network with other photographers who are either looking to buy or sell gear. If you’re lucky, you might even find someone willing to give you a deal on their used gear.
Another benefit of shopping at local stores is you feed your local economy. Often online stores or big chain companies are foreign and export all profits outside of local communities. Staying local encourages your local economy to grow.
2. Adorama and B&H
Adorama and B&H are two of the largest and most well-known camera sellers on the market.
These two companies are known for having a wide array of used camera gear. You can find everything, from the most well-known camera brands to the smallest camera companies on their site.
To help you choose a camera with confidence and ease, both companies offer a rating system that indicates the condition that gear is in. They also offer a 30-day return policy for most of their used camera gear.
Even better, both B&H and Adorama offer warranties on their used gear. Only Adorama enables you to purchase extended warranties for your gear which can range from one to five years long. Nonetheless, such warranties are great safety nets in the event that your camera bugs out.
Also, if you are looking to offload some of your old gear before buying your used gear, these two stores are the perfect place. They’ll quote your piece immediately and allow you to ship it to them at no cost.
You won’t make as much as you would selling it yourself, but it’s a quick sale. For example, units that would sell on eBay for over $2,000 may only bring you $1500 depending on its condition.
Pro Tip: Adorama and B&H offer a student and educators discount. They only require you to provide your institutional email, school ID, and transcript to get the additional discount.
The discount will vary depending on the product and current promotions, but I have seen some products with a 40% student discount.
3. KEH Camera
KEH is another excellent online store to purchase used camera gear. Their easy-to-use website and refined filter search system make it easy to find exactly what you are looking for.
Similar to B&H and Adorama, KEH also uses a condition rating system from 1-10, so you always know the quality of the camera you are purchasing.
They also offer a 14-day return policy and offer an extended 6-month warranty uncommon to most competitors.
Finally, unlike most online retailers, KEH offers a large range of film camera gear in addition to digital camera gear. They are one of my favorite go-to’s for used cameras and film-based cameras alike.
4. Borrowlenses
Borrowlenses originally began as a rental company for lenses but has since evolved to buying, selling, and renting of camera gear.
One of my favorite things about Borrowlenses is that you can rent and use the gear before you decide to purchase it. Although renting can be expensive, it is worth it to ensure you are buying the camera gear you need and want.
5. Lens Authority (Owned by Lens Rentals)
Combined with its sister company lensrentals.com, Lens authority offers pre-inspected, graded, and tested gear. The majority of their stock is pre-rented equipment that has been retired and is being liquidated. All of their products are covered by a 90-day warranty for day-to-day damages.
6. Midwest Photo Exchange
If you like working with family-owned companies, then consider buying from Midwest Photo Exchange. Most of the items they sell are of Nikon’s, but you’ll occasionally find a gem amidst their collections.
Although not as thorough as the previous companies mentioned, Midwest Photo Exchange also offer a rating system for their used gear. They also have a workable return policy of 15 days.
To ask about pricing, they offer live-quote options, but you can also contact them by phone.
7. Facebook
Buying used gear on Facebook is another great option for a couple of reasons.
First, people on facebook are typically eager to finalize a sale, hence are more willing to lower their prices. Second, buying from Facebook usually means you’ll be able to inspect the gear in person and be sure it is in good condition before buying.
To find potential sellers, you can either join a group or keep an eye out for used camera gear in an open group.
Joining a group is an easy way to get connected with thousands of potential sellers.
Although sometimes finding your way onto a Facebook-based Camera Group can feel like trying to find an invite to an exclusive club.
To improve your chances, see if you already know someone who’s already a member. Chances are one of your photographer buddies will be.
There’s also the option of you joining an open group. Or you can watch out for used gear in the Facebook marketplace.
8. Local Companies & Mailing Lists
Be sure to introduce yourself and make friends with the owners of the companies in your area that use lots of camera gear.
Often, production companies, rental companies, and studios clean house. They’ll reach out to other companies and their friends with lists of the gear they have available. This is a great place to find lots of camera gear at a great discount.
You may also reach out to them when you have gear of your own to sell and hope to get a good price. By working closely with them you’ll support local businesses and build rapport.
9. Yard Sales and Estate Sales
You aren’t likely to come across a truly stunning, modern piece of equipment at one of these places.
However, the odds that you’ll stumble across awesome vintage photo lenses, super 8mm and 35mm cameras are quite high. Even better, you can they typically buy them often for under $25.
You want to get there early to get the best stuff though, typically at 9 am.
10. eBay
The sheer quantity of inventory they have on eBay makes it an awesome option to buy used gear. Plus, the eBay community tends to be made of great people who are willing to throw in extras or to negotiate on buy now items.
That said, using eBay requires a little bit of luck and a lot of knowing what to look for. It’s not uncommon for buyers to encounter fraud and poor quality equipment on this site.
To protect yourself, to read other buyers reviews and check the rating of the seller. Don’t be afraid to ask for additional pictures either.
Another great way to protect yourself on eBay is making sure the seller accepts returns and warranties, especially if you’re buying high dollar items.
Also, whether you’re buying or selling, make sure you have protection from Paypal.
11. Craigslist
Craigslist is another great place for thrifty buyers. You’ll often find great deals on this site, especially if you’re willing to take the time to browse.
That said, you want to be careful when using this site. Scammers can happen, there’s no quality control, and stolen goods are often marketed through here.
Great options occasionally turn up, but vigilance is key. Do your research, know what you want, and be willing to negotiate regardless of whether you’re the buyer or the seller.
How to Determine Quality: Used Lens
When buying used, it’s important to be able to determine a high-quality lens from a low-quality one.
A careful assessment of any used piece is the only way you can know how risky the purchase is going to be. Often, minor lens issues can be fixed at a low cost, which means that even used lenses with issues can still be beneficial and worth the risk.
Here Are Some Tips to Help You:
1. Check for a Serial Number
Request or verify that there is a serial number on the camera. Lenses without serial numbers can be counterfeit or stolen.
2. Lens Construction
Get a good sense of what a quality lens feels like. To do this, you can go to a camera store and ask to see and use some of their best lenses.
Be sure to test out multiple types of lenses at different focal lengths, so you have a good idea of what different lenses feel like.
You’ll notice that quality lenses feel like the ‘real’ deal. That is because they are built with durable material that causes them to be heavy and sturdy.
3. Watch Out for Exterior Damage
Inspect the internal and external optics for scratches and chips. To make these imperfections more clear tilt the lens so that the light falls on the optical illusion.
Also, keep an eye out for any scratches, dents, and cracks on the body of a lens. If there is significant damage to the outside body, this could be a sign of internal damage.
4. Test the Lens
Test your lens to determine whether the zoom, focus, and aperture blades are all working properly.
To do this, select the settings you want to test and take an image. Using the photos, you can determine if there are any issues.
Also, check for dust, mold, and rust inside and within the lens. Dust and mold can cause unwanted blurriness and uneven contrast in a photo.
The best way to check for mold or dust is to shine a light through one side of the lens. Look through the other side and any particles should be highlighted by the light.
Rust is caused when a lens is exposed to water without proper protection. This can cause the moving elements of a lens to get stuck.
Remember that mold and rain are deal-breakers as they can infect not only the camera but other lenses you use on it.
Finally, remember to take your time. Rushing your process will cause you to miss important details. Keep in mind that if the seller is rushing you, they are probably trying to hide something so stay safe.
5. Check the Aperture Blades
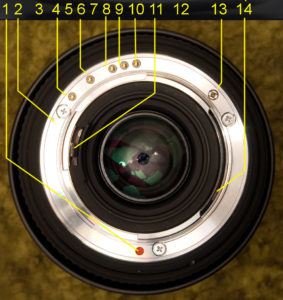
To test how clean and responsive the aperture blades are, you can press on the small lever (#11 on the above image) found on the backside of the lens.
As you press the lever, pay close attention to the aperture blades. If they appear to be missing, chipped, sticky, or bent stay away from the lens. Any resistance, stickiness, or oil that has collected on the aperture blades is a red flag.
6. Check the Buttons and Rings
Make sure all the buttons, rings, and levers on the camera work properly. Be aware of sticky or grinding when pushing the buttons or adjusting the lens rings.
7. Test for Sharpness
It is important to check the optics and sharpness of a lens.
To check the sharpness, manually focus your camera at an object. Use a tripod to avoid camera shake and get a perfect focus. If the camera does not focus perfectly, it may indicate that the lens is out of alignment.
While you’re testing, be sure to explore the entirety of the aperture range and check all areas for sharpness. A straight shot to the chart, even at f/2.8 should show all-over sharpness.
Also, consider testing the lens using a lens sharpness chart. You can easily find a chart online and place it on the wall on check the focus of your lens.
Test the sharpness of the lens using a lens sharpness guide. Available online, these charts can be printed out and placed on a wall to check the focus of your lens.
Other things you want to check for on a second-hand lens include:
Filter threads that are worn or damaged. A Filter thread is the rigged ring at the front of the lens that is used to attach a filter.
Snugly fit rubber rings that move smoothly. Rubber rings are placed on the lens and indicate where the zoom and focus rings are located.
8. Worn Lens Mounts
Check that the lens mounts properly to the body of the camera. A lens mount is a mechanism (Full lens mount shown in the image above) at the back of a lens that allows you to attach it to a camera.
When a lens mount becomes worn or damaged, they can hurt your camera’s mount. A damaged lens mount may result in a lens that is unable to attach to the camera properly. This can lead to severe problems if you continue using damaged lens mounts because you can end up damaging the camera’s mount.
If the camera or lens mount is damaged, they are impossible to repair and makes your lens unusable.
9. Contacts
Critical to your camera’s function these can be costly to repair, especially if they’re corroded. The contact looks like small metal balls located on the ridges at the back of a lens ( #4,6,7,8,9,10 on the above image).
These metal balls are used to transfer electrical information from your lens to your camera. When these become damaged or corroded the communication between your camera and lens are compromised.
How to Determine Quality: Camera Body
Used Camera Body Its normal for a used camera body to have wear and tear on outside. This is usually a sign that the internal components have some miles on them.
The more wear and tear you see on the outside you can imagine that the outside inside of the camera is no different.
1. Check for a Serial Number
Request or verify that there is a serial number on the camera. Cameras without serial numbers can be counterfeit or stolen.
2. Shutter Count Lifespan
When buying a used camera body, ‘it’s essential to determine its current shutter count. This will give you a good idea of how much the camera has been used.
For example, a three-year-old camera with 10,000 shots is one that has barely been used. On the other hand, a one-year-old camera with 100,000 shutter actuation is one that has been used quite extensively.
The shutter count is the baseline used to judge a cameras life expectancy.
Camera manufacturers typically publish the life expectancy of all their camera models. This means that with a simple google search, you can find the exact lifespan of your camera.
A general rule of thumb is that high-end cameras have a shutter life of 200,000, average cameras 100,000 shutter life and low-end cameras have a 50,000 shutter life.
It is important to remember that the shutter count lifespan is not a strict number for when the shutter will stop working. Instead, it is the average number of shutters at which the shutter stopped working.
If you are interested in real-world statistics for your camera model visit this site.
The website collects shutter count data from visitors to the site and displays it in a graphical representation. This allows you to see how your camera performs in reality compared to the shutter lifespan given by manufacturers.
One thing to remember is that every device is different, and every iteration of that device may not follow the same life cycle. Read up on your model on various forums, look up reviews on online markets, and find out what actual users have to say.
3. How To Find Your Camera’s Shutter Count
There are a few ways you can determine the shutter count of a camera before you buy.
The first and perhaps the easiest is to ask the seller. However, be aware that it’s not uncommon for sellers to manipulate the shutter count of a camera.
To find out the ‘camera’s shutter count for yourself, you can take an image using the camera and use its metadata.
If ‘you’re a MAC user, you can open resources and then click on the EXIF tab. Scroll down until you find the image count.
If ‘you’re a PC user, you can download special software designed to read the metadata. If you ‘don’t want to download special software, you can upload an image on one of the following websites:
MyShutterCount.com
ShutterCounter.com
CameraShutterCount.com
Once your image is uploaded, the website will give you the current shutter count of your camera.
It’s important that you are aware of both the cameras shutter count lifespan as well of the current shutter count of the camera. Knowing both of these will help you make an informed decision about the quality of the camera.
4. Look for Oil and Dirt
Take the body cap off and look closely at the interior of the camera. Check the inside of the camera using a small light source, and hold the camera face down so additional dust and dirt can’t get into it.
As you check around the interior, note that any gunk, dirt, or oil that builds up inside these areas must be noted. Oil, in particular, can indicate problems with the internal mechanisms of the device.
5. Check the Sensor
Check the sensor for any issues.
To do this, get yourself a reliable lens and do a series of test shots. One way I like to do it is setting the camera to f/16-22 and take a photo pointing at a bright light.
After, view the image on the LCD screen or a computer monitor while zooming in and out. Watch out for scratches or other markings on the image.
It’s likely that you’ll see dust spots as you are shooting with a small aperture. If you do, you shouldn’t worry as they can easily be cleaned.
But anything that looks like a fragment of worms lines is probably a result of a scratch on the sensor.
6. Check Focus
You also want to check the autofocus in the camera body Do a series of test shots using both continuous and single autofocus.
Using a focus chart is the best way to test the autofocus of your lens. There are many focus charts you can choose from online.
Start by hanging the chart on a wall that is parallel to your camera’s sensor.
Next, position your camera at the hyperfocal distance of your given focal length. This can be calculated for you by online calculators. Once you have positioned your camera, make sure you hold exposure settings and lighting in your scene constant.
Next, focus on the center of the chart and take a photo. This photo will be your baseline and should be in perfect focus.
Now move your focus ring, this will test your cameras autofocus feature. When you capture your next photo, the lens autofocus should capture the image with perfect focus (same position as the first photo). If your camera does not capture the image with perfect focus there may be an issue with the autofocus ability.
Be sure to perform this step multiple times holding all other variables constant to ensure there is an issue with the autofocus
Repeat these steps for each focal length of your lens and remember to adjust the distance of your camera accordingly. If your lens has multiple AF modes also test each mode at all of your focal lengths.
7. Buttons, Dials, and Compartments
When purchasing a used camera, it’s essential to make sure all the buttons and dials still work properly. Pay special attention to the buttons that get used the most such as the shutter button, camera modes dial, power button, flash, and the live view button. Avoid purchasing a camera if the buttons are sticky or don’t work at all.
Also, when pressing the flash button double-check the flash pops up and the bulb functions. Be sure there is no rust inside the flash mechanism this can lead to problems in the future.
It’s also important to open all the compartments of a used camera. This will give you a glimpse into the internal condition of the camera.
The two most important compartment to check the battery and memory card slots. Make sure these compartments work properly and that there is no corrosion or rust present.
8. General Wear and Tear
The exterior of the camera will hold many stories of the history of the camera that may determine its value.
Marks, scratches, and scuffs aren’t uncommon, but heavier blemishes can mean the camera has been mistreated.
Conclusion
Remember to negotiate. You could save yourself a significant amount of money by doing so.
Also, never let yourself feel like you have to buy an item. If you have any doubts, wait. Spend the time to weigh up the pros and cons. The best way to buy used gear is with careful research and investigation.
Stick with reputable websites and other information sources, and never trust a deal that seems too good to be true.
Good luck and happy hunting!