The first step of making a packing list should be to establish where you’re going; then you can proceed to think about what to pack. Remember to pack only what you need and not what you think you’ll need. The idea is to travel light.
Also, keep in mind that you’ll mostly be on the road and you will be carrying everything you bring with you. So, only bring what is necessary and nothing more.
1. Camera
In general, a smaller-sized camera with an interchangeable lens system and a quality sensor will do the job. However, this will depend on what you’re shooting. In any case, your camera options include point and shoot, mirrorless, and DSLR cameras.
Point and Shoot Cameras
1. Smartphones: Smartphones may not be the first thing that crosses your mind when it comes to high-quality photography. But, today’s smartphones are loaded with impressive camera features powerful enough to take amazing images.
Smartphones are by far the most convenient camera to carry around. Also, smartphones allow you to perform many functions that traditional cameras require a computer for. For instance, you can edit photos and even share them directly to the internet within a matter of seconds. Another advantage to smartphones is they offer more storage space compared to most digital cameras.
2. Compact Point and Shoot: Compact point and shoot cameras allow even first time users to feel comfortable with its simple features and design. Features usually include the ability to shoot in both manual and auto mode.
Compact point and shoot cameras usually have a fixed focal length with a digital zoom feature. Keep in mind that this means you won’t have control over your camera’s focal length. That is, whenever you zoom in, your camera would simply magnify a portion of your image and crop the rest.
The compact version is often smaller, but size differences can be marginal in some instances.
Here are some point and shoot options I recommend:
High End:
Midrange:
Budget:
3. Advanced Point and Shoot: Advanced point and shoot cameras have more features than compact point and shoot. The key additions typically include more settings, a zoom lens, and the ability to shoot in raw. These cameras typically cost more than the compact version, though both are still less expensive than mirrorless and DSLR cameras.
Best Advanced Point and Shoot Options
Mirrorless Cameras
Mirrorless cameras are usually smaller, thinner, and lighter than DSLR’s while producing the same high-quality images.
Unlike point and shoot cameras, mirrorless cameras have an interchangeable lens system. Though its lack of lens compatibility was heavily criticized when it was first released, it has since significantly improved since. Today’s mirrorless cameras have increased lens compatibility and selection.
Many of the disadvantages that initially came with using mirrorless cameras are disappearing as the technology improves.
Mirrorless cameras also features a digital viewfinder.
A digital display viewfinder allows you to view the real-time effects of adjusting settings like aperture and ISO. It also gives you the option to display features such as histograms and focus directly on your viewfinder.
Mirrorless offers a great combination of size, versatility, and quality, unlike no other camera.
Compared to DSLRs, mirrorless doesn’t force you to forgo compactness for image quality or an interchangeable lens system. It is one of the reasons many travel photographers opt to replace their DSLR’s with mirrorless cameras.
Best Mirrorless Cameras:
Here are a few mirrorless camera options. If you have a brand preference you can choose from these but If you don’t I recommend the Nikon z6.
Digital SLR Cameras
DSLRs are the most common type of cameras used in digital photography. Before the rise of mirrorless cameras, DSLRs were unmatched in their capabilities.
One of the main distinctions between mirrorless and DSLR’s is the viewfinder. DSLRs use an optical viewfinder which displays your scene exactly as it appears in real life.
Due to the dated technology of optical viewfinders, DSLR cameras are usually larger and heavier than mirrorless cameras.
DSLRs have a distinct advantage over mirrorless in that you’ll have a wider variety of options available in the market.
Several other advantages of DSLRs cameras include longer battery life, faster focusing, and more lens and accessory options.
DSLR Options:
Professional:
Enthusiast:
Entry Level:
Underwater Camera for Travel Photography
As a diver, I rarely travel without an underwater camera. And when it comes to underwater photography GoPro is my go-to brand.
Other than being small and easy to carry, they are amazing when it comes to getting ultrawide shots. If you love to take aquatic wildlife pictures like me, this one should be in your bag too. If you don’t have an underwater camera, a waterproof smartphone case will do just fine.
Drones
The last on our list of cameras are drones. There are two things you should consider when taking a drone on your trip: airline regulations and country regulations.
1. Airline Restrictions
The regulations for drones will vary based on the airline. For instance, some airlines require you to carry your drones’ batteries in your carry on while others won’t. I recommend looking up your alines policy or contracting them directly regarding your drone.
2. Country Specific Restrictions
If you plan on bringing a drone on your trip, note that certain countries may not permit it from entering their airports. Certain countries have banned foreign drones from entry while others have banned drones completely. Some of these countries include:
Algeria, Barbados, Brunei, Cuba, Iran, Iraq, Kuwait, Madagascar, Morocco, Nicaragua, Syria, Senegal, Saudi Arabia
Another thing to keep in mind is that there are places within a country that have their own rule and regulations. If you’re planning to photograph a popular location make sure to check their drone policies.
If you plan to bring your drone, be sure to do your research before you leave for your trip.
Best Drone Options:
Advanced:
Intermediate:
Beginner:
2. Lenses
The general rule of thumb for lenses is to carry a few that work well in various situations. As a travel photographer, there is only so much that you can carry in your bag. Space is a scarce resource when traveling, so it’s essential to use it wisely.
I find a fast prime and walk around (zoom) lenses to constitute a perfect pair. Specifically, I like to carry a 14-24mm, 70-200mm, and a 50mm prime. Though both types of lenses are useful, in my experience a walk around lens is usually enough to get most of the job done. It’s not uncommon for me to go through entire trips using only my walk-around lenses.
Your choice of lenses will, of course, depend on what you will be photographing. It is not all the time that you will be shooting vast open landscapes with simple lens requirements.
There are times when capturing clear details is of the essence, such as when shooting wildlife. In such a case, you may want to bring a big telephoto lens despite the immense weight it adds to your luggage.
To break things down, here are the various types of lenses and the respective instances where you’ll want to use them.
Landscape Photography Lenses
1. 14-24mm: The Nikon 14-24mm wide-angle lens is my favorite for landscape photography. It is a top of the line lens that offers stellar results each time you use it. I particularly love how sharp the images taken by this lens are. It also boasts incredible image stabilization, weather sealing, and excellent build quality. You may, however, feel hard-pressed by its relatively high cost and the fact that most regular filters won’t work on this lens. You’ll have to look for special filters if you have to use one.
2. 16-35mm: Another one of my favorite wide-angle lenses is the 16-35mm. Similar to the 14-24, the 16-35mm is sharp and focuses quickly. Though the focal length 16-35mm is slightly smaller it is comparatively cheaper. It also has the advantage of being able to work with most filters. Although similar, most landscape photographers prefer the wider focal length of 14-24mm and use 16-35mm primarily as a backup.
Wildlife Telephoto Lenses
1. 80-400mm: The Nikon 80-400 lens is by far the most popular option for wildlife photography. It produces sharp images with its fast focusing and excellent vibration reduction features. This means your handheld shots will remain crisp in most lighting conditions.
2. 150-600mm: The Tamron 150-600 is a great inexpensive and lightweight option. The Tamron SP 150-600 VC provides a massive telephoto reach of 600mm at f/6.3 on a full frame camera.
Portrait Lenses
1. 70-200mm: My favorite lens for portrait photography is the Nikon AF-S NIKKOR 70-200mm. The lens has amazing optics and Nikon’s proprietary vibration reduction technology. So you can be sure that your handheld photos will be sharp. The camera also has weather sealing and excellent build quality. The downsides are that its heavy and expensive.
2. 24-70mm: The Nikon 24-70mm is my second best option for portrait photography. It is great for low light photography and renders super shallow depths of field with amazing subject isolation. The lens has excellent optics, build quality, and unequaled sharpness. However, it lacks image stabilization. Similar to the 70-200 it is also heavy and high and cost.
3. 50mm: The Nikon 50mm 1.8 prime lens is a cost-friendly and lightweight alternative. It is inexpensive and offers great results in low light conditions. You’ll also like how compact the lens is, which is perfect for both portrait and street photography.
All-Around Lens
1. 28-300mm: The Nikon 28-300mm f/3.5-5.6G ED VR AF-S is a great walk-around lens. I used this lens as my primary walk-around lens for the first three years of my photography career. Its focal range is perfect, the sharpness is great, and the build quality is really good. Not to mention that it has vibration reduction which produces great handheld photos.
The Nikon 28-300mm f/3.5-5.6G VR has a relatively fast and accurate autofocus feature. The focus tracking on this lens works quite well, though it tends to underperform when shooting fast-moving subjects.
3. Tripod
A tripod could be one of the heaviest tools in your arsenal, but one you don’t want to leave behind.
A tripod will allow you to shoot at much slower shutter speeds without worrying about camera shake.
Slow shutter speeds are what makes it possible to shoot in low light conditions such as shooting at night. Longer shutter speeds are also what’s necessary to create a silky water effect typically seen in pictures of beaches and waterfalls.
Other than preventing camera shakes, a tripod is also useful whenever you want to take a self-portrait. To do this, set a timer while your camera is mounted on a tripod, and shoot.
Using a tripod will give you better creative control over your images. You won’t regret being able to take your best shots without compromising on quality.
4. Camera Bag
Your choice of bag will depend heavily on what you’ll be shooting and what it will take to get there. This is why it’s important to choose a bag that will help you reach your destination in the most efficient way possible.
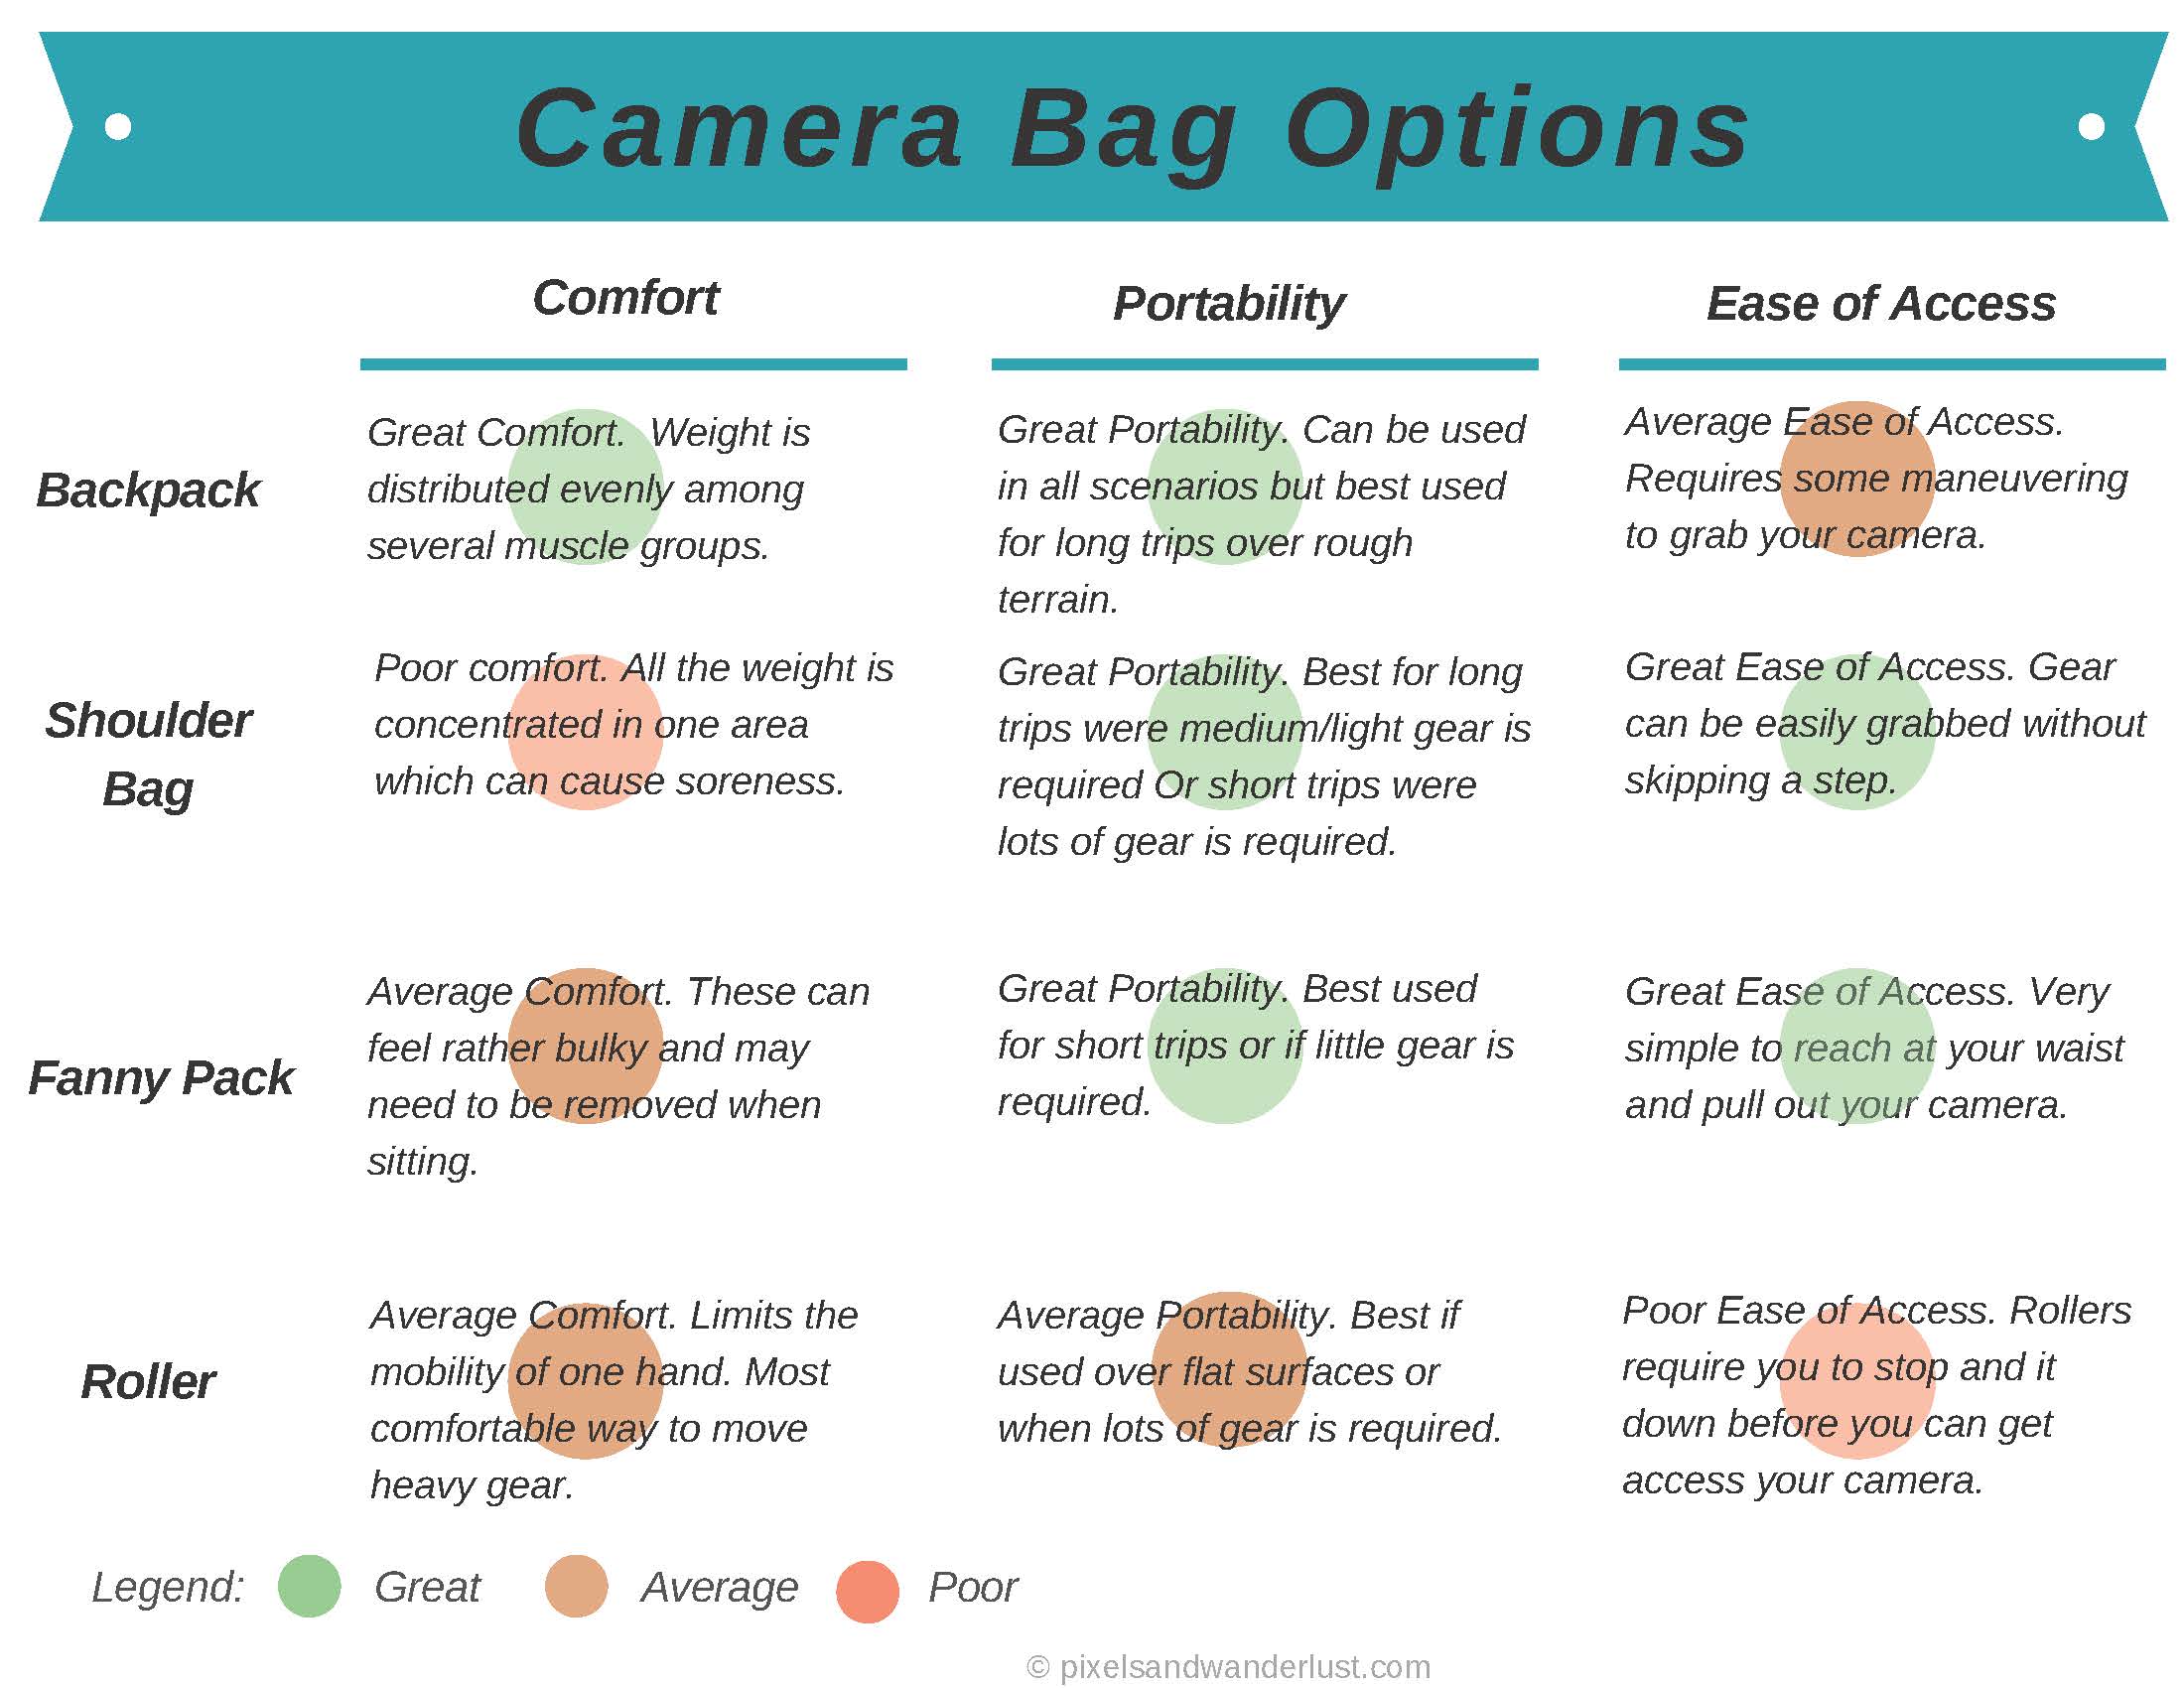
There are four styles of bags that you can choose from: backpacks, shoulder bags, fanny packs, and rollers.
After deciding which camera bag option is the best fit for you, consider the following:
Weight
The weight of your bag is incredibly important as a traveler. It is important that you choose a bag whose weight you are comfortable carrying for an extended period of time. Heavier bags can take a toll on your body after long trips. This usually results in back and shoulder pain.
Also, the weight of your bag will impact your agility while carrying it. I often find myself walking for miles when I am traveling and looking for photos. Heavier bags tend to slow you down and make traveling more difficult. Keep this in mind if you plan on walking long distances.
Size
When choosing a camera bag, bigger is not always better.
Bigger bags usually makes it tempting to bring unnecessary gear. The extra room in your bag can also be problematic in terms of balance and comfort.
Choose a bag that fits your gear comfortably. You don’t want your gear to be too loose or too snug. Your gear should have sufficient space to prevent damage as you travel.
Ease of Access
The level of ease you can access your gear is important as a travel photographer. Different styles of bags will vary in their ease of access. Typically the easier it is to get your gear and start shooting the better. Inspiration can strike at any moment and you don’t want to miss a shot because you can’t reach your gear.
When choosing a bag, see how many steps are required to access your gear. The fewer steps, the better. For example, a fanny pack requires one step: reach down and grab your cameras. On the other hand, a roller bag requires that you stop and set it down before you can grab your gear.
The ease of access will also be affected by the opening and closing mechanism of your bag. The easier it is to open your bag the faster it will be to take your gear out. Bags with zippers and velcro usually work great.
If you’re buying a bag with a zipper, check how well it functions. Also, keep in mind that bags with excessive buckles and velcro can slow you down.
Bag Material
You will want to choose a material that offers protection and longevity. Your bag material should protect your gear from the elements.
A good tip is to make sure the sealing on your bag is weatherproof. Some common fabrics used are canvas, nylon, polyester, and cotton.
Nylons are well known for their waterproof capabilities. Ripstop Nylons are designed to prevent rips and punctures and are commonly found on caping and hiking bags.
It’s important to consider a material’s resistance to tearing, durability, and strength. These three characteristics will determine the longevity of your bag and what will give you the best value for your money.
Your camera bag should stick with you through adverse conditions without much wear and tear.
Compartments and Paddings
Padding protects your gear during your travels. When you travel, your bags go through a lot, from airplanes to bumpy car rides. Proper padding leaves your gear unaffected by the constant movement of travel.
The compartments in your bag are important for organizing and keeping your gear protected. You want sufficient compartments so that your camera(s) and lenses each have their own compartments. This will ensure your gear will not hit against each other during your travels.
Another thing to consider is your laptop. Having a laptop compartment will help consolidate all your gear in one place.
Based on your preferences and what you consider important, you should be able to scan the market and find a perfect fit.
Portability
The portability determines how easy your bag is to carry around. As a photographer, you usually carry your bag everywhere you go.
There are several aspects that influence the portability of your bag: support and weight distribution. The most important is weight distribution. You want a bag that distributes weight evenly among body parts and muscles. If your bag places all its weight in one area it reduces portability and often leads to pain and soreness.
If your bag is heavy, it is important to consider what additional support it offers. Certain bags offer lumbar support, snap belts, and wheels which can improve the portability of your bag.
5. ND Filters
ND filters are designed to filter direct light. This enables photographers to create certain effects that are otherwise difficult or impossible to make. In particular, ND filters allow you to shoot at slow shutter speeds and wide apertures without overexposing your images. They are especially helpful if you want to capture the movement of water.
Here are some of my favorite ND Filters:
6. Batteries
Always bring extra batteries with you on your trips. As a traveler you never know when you are going to have access or time to charge.
You don’t want to find yourself stuck in a hotel room during prime shooting hours because you need to charge your batteries. An even worse situation is missing that shot you’ve been waiting for because your camera is dead.
When I travel, I try to bring at least three or more batteries with me. This way, I’ll never miss out on any photo opportunities.
7. Chargers
Every one of your electronic gadgets is going to run out of charge at some point. So don’t forget your chargers. A trick I use to avoid this is to pack them before items I am unlikely to forget like my camera.
Travel Adapters
Other than chargers, travel adapters are also easily overlooked when packing. Without them, you may not be able to use your chargers on your trip. Travel adapters can be costly in other countries, so it’s a good idea to buy one before you leave. Invest in a travel adapter that adjusts to multiple countries so you won’t have to buy a new adapter for each one.
EPICKA Universal Travel Adapter
Portable Chargers
Also, keep in mind that when you travel, you won’t always have access to an outlet when you need it. Carrying a portable charger gives you the power to charge on the go.
Many new compact chargers available today are amazingly powerful. I recommend getting a portable charger with at least 10,000 mAh; this will give you at least two full charges depending on the device. You can also increase your portable charger to 20,000 mAh, this will allow you to go longer in between charges.
Most of us think that portable chargers are only compatible with USB ports, but today portable chargers with an outlet are available. While these are larger and more costly, it is something to consider if your devices can only be charged using an outlet. If you want to see a list of my top portable chargers for travelers click here.
Wireless Chargers
When traveling you may need to bring many chargers and thus many chords. One way to reduce the number of chords you have is by switching to a wireless charging port. Be aware that not all batteries and devices will work with a wireless charger so do your research before buying one.
If you are not keen on using wireless charging consider using cord organizers to store your chargers efficiently.
8. Memory Cards
Here, the rule is simple: carry twice the number of memory cards you think you are going to require. Memory cards are generally small and lightweight, so they should not be hard to carry around.
More memory is always better than no memory. It is the one decision you’ll never regret making. You wouldn’t want to be forced to delete old shots to fit in new ones once you’re out of space.
9. Hard Drives
Hard drives are important for storing and backing up your images for long term use. Bring at least one hard drive with you on every trip. Most hard drives come with one TB of storage which is more than enough space for one trip.
Hard drives allow you to transfer your photos from your memory cards so you can keep each memory card fresh and ready to go. They also allow you to back up your images to ensure you have more than one copy at all times. Simply transferring your files onto your laptop can be risky. In the unfortunate event that your laptop breaks or is lost, having an extra copy can be a lifesaver.
I like to keep my hard drive in a separate bag from my laptop and camera so that If I lose one bag I don’t lose all my files with that one bag.
10. Cleaning Supplies
Traveling puts your camera through a variety of environmental and weather conditions that exposes it to dust and dirt. It’s a good idea to bring some supplies with you to clean all your gadgets.
You can purchase a camera cleaning kit which typically includes: microfiber cloth, air blower, lens cleaning pen, and alcohol cleaning solution. These kits have everything you need to clean your camera.
Personally, I only bring a few microfiber cloths and a spray bottle with me. This is usually enough to clean my gear properly.
11. Rain Cover for Your Camera
Though your camera is weather sealed it is not rain proof. A rain cover is a wise investment for increased protection. These are not only useful in the rain but also if you are going to a location that has lots of mist and spray such as waterfalls.
In particular, on my last trip to Iguazu Falls, I didn’t expect there to be as much mist and spray as there was. Luckily, I had my rain cover, else my camera would’ve been destroyed, or I would have had to sacrifice the shot I was trying to get.
12. Small Flashlight or Headlamp
If you are going to shoot at night, a small flashlight or headlamp becomes a necessity depending on where or what you are photographing.
Flashlights can also come in handy if you are in need of artificial lighting. For example, a flashlight can be useful to light up subjects in low light conditions. If you can be creative enough with your lighting this small addition can bring out the best in your photographs.
For these reasons, lighting tools make an excellent addition to your kit.
13. Laptop Accessories:
If you intend to do some post-processing while you are traveling, you may want to bring a mouse and a mouse pad. Using a mouse makes post-processing much easier especially if you’re working on a small screen. Better yet bring a pen tablet for more precise photo editing.
Bonus: Know How to Use Your Gear
The best camera equipment in the world will be useless if you don’t know how to use it. Learn as much about your camera before leaving for your trip. If you haven’t already, this may be a good time to read your camera’s manual.
In addition to learning how to use your camera it is a good idea to brush up on your photography skills. Spend some time practicing before you leave. This is the best way to ensure that you can adapt to new situations and take amazing pictures with ease.
Conclusion:
By now, you have researched your destination and got a precise idea of the camera, lenses, tripod, drone and other equipment and accessories that you must bring with you. Stick to this list, and strictly avoid the temptation to go overboard for that predictive shot you’re imagining. Trust in what you’ve chosen to carry to be able to do all the work ahead of you.
Read the rest of the series:
- 15 Tips for Planning Your Next Photography Trip
- 13 Essential Gear for Travel Photography
- 24 Tips on How to Take Great Photos When Traveling