Much like any international travel, good travel photography starts long before boarding the plane. Knowing everything you can about the destination you intend to visit will determine how you prepare for the trip.
As a photographer, you’ll want to learn about the different compositional opportunities before you set foot on the location. That said, how do you go about your research?
1. Talk to People Who Have Been There
Those who have been to the place you want to visit are a rich source of information. Reach out to them and inquire about the various aspects of the location.
Ask them to recommend where to stay, the must-see places, and what their favorite locations are.
In case you don’t personally know anyone who has been to the location you intend to visit, turn to the internet and guide books for travel advice.

One such reliable tool is wikitravel.org. It provides free, comprehensive travel information on locations worldwide. This open-source travel guide lays out up-to-date information about attractions around the world. It also has information about restaurants and hotels where you could stay.
Start by reading the introductory page for the city or country you are visiting. You should be able to find quality travel information that is essential for your trip. The page has rich insights into the culture of the place, history of the people, climate and more.
Wikitravel.org also has information about specific regions. It is designed to help you with everyday travel decisions such as accommodation and recreational activities.
2. Study Other People’s Images
Study the works of other photographers for inspiration and new compositional ideas.
The internet has simplified the sharing and access to various works of photography. Tools like Google Image Search and social media platforms like Instagram make it easier for you to carry out your image research.
 For example, you can use these tools to learn about iconic subjects. They can give you information such as the icons’ appearance and location. They can also assist you in finding compositions that are yet to be exploited. You could also stop by a few stock photo sites to see how other photographers have covered various locations.
Pay attention to the comments of the photographers on these photos. What are others saying about these locations? Was their experience good or bad?
Your local library and bookstores should be in your list of resources to check out too. There, you can easily find photo detailing different locales around the world. So do tourism websites, where you’ll find various photo galleries often grouped under specific regions.
From there, target your research to finding angles and lighting conditions that are bound to create great pictures of the subject(s).
When finding inspiration, be sure not to compare yourself with other photographers. It’s perfectly okay to find yourself marveling at images in authority magazines like National Geographic. But make sure to keep it purely inspiration-targeted.
Remember you’re researching your next travel photoshoots and not some contest. It’s an opportunity to learn something new and inject that new knowledge into your subsequent photo shoots.
Caveat: Try not to recreate the various photos you have seen in travel magazines. Focus instead on coming up with something new. When you tell a story in your unique way, you’ll be proud of yourself.
3. Learn About Festivals and Celebrations
Schedule your visits to overlap with specific events and celebrations. Festivals and local celebrations are filled with excellent photographic opportunities. Such events are usually characterized by large display color and culture that could make for fantastic photo compositions.

Being in festivals also maximizes your chance of meeting people in a celebratory mood. Such people are likely to share their joy with you. The festive setups can go a long way in translating to lively images.
Go for high moments of beauty; things that naturally make your viewers want to immerse themselves at the moment with you by just looking at your shots.
You can go online to look at the calendar of events in a given destination. Different countries have specific directories and websites that provide information about their cultural activities.
4. Study Weather Conditions
Weather plays a crucial role in determining the type of mood your images will have. As part of your research, decide in advance the kind of visual story you are trying to tell. Will it be warm and inviting, or cool and distant? Would a bright and sunny location make sense? Or should you aim for cold and snowy conditions?
Seasons and weather conditions will have a significant impact on your images. Thus, this is something you shouldn’t gamble with and wait to figure out on site.
There are many available online tools and apps you can use to help you plan for the weather in advance. It will be a good idea to have bookmarks for local weather on your phone. You should be able to get a suitable weather app such as Accuweather, and NOAA to help you track and forecast the weather.
5. Learn About Sunrise and Sunset
Golden hour occurs during sunrise and sunset. It is so named because a beautiful gold tint characterizes the light during this time. If you are like most photographers, you’ll probably want to take as many golden hour shots as possible.
 To capture the golden hour successfully, it is imperative that you do some prior research. The research is to help you determine the time and location of sunrise and sunset beforehand. Planning is particularly helpful if you know how you want to capture the sun relative to your subject.
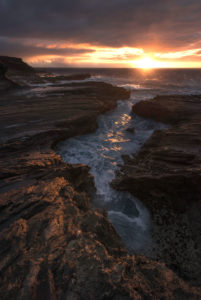
For example, I took the photo on the right on a winter trip in Hawaii. I deliberately scheduled the trip during that time because I knew the sun will line up the way it did with my composition.
When doing your research about your subject(s) ask yourself: Do you want your subject to be front-lit or backlit? Do you want the sun inside or outside your frame? These are the types of questions you should consider in planning for your photoshoot.
You’ll also want to know the time of sunrise and sunset. Try to arrive at a location for at least one hour in advance. Early arrival will give you enough time to set up your equipment and compose your shots appropriately.
To help you with your research use apps such as Photographers Ephemeris and Sun Surveyor. These apps can tell you the exact path that the sun is going to take throughout the day.
6. Learn About the Moon Cycle
Another photo condition you should keep in mind is the moon cycle. The proper use of moonlight can greatly enhance images.
 The view in Iguazu falls, for example, is spectacular during the full moon. During this time of the month, you’ll often see a moonbow over grand cataracts.
Some consider the Taj Mahal to look best under the full moon. This view is so popular that they open the Taj once a month for visitors to see it under the full moon.
The moon is also something you should consider if you plan to include the Milky Way in your shot.
The Milky Way is most visible when the moon is at its darkest. Keep in mind, during this time the moon will not be bright enough to light up your foreground. Your foreground will be the best lit during the full moon; though at this time the Milky Way will be its least visible.
I prefer shooting during the quarter moon phases because it produces the best balance between the brightness of my foreground and visibility of the Milkyway.

Choosing the right moon phase to include with your Milky Way will depend on your composition. If your priority is the details in your foreground, then shoot during the most bright moon phases. On the other hand, if your priority is the visibility of the Milky Way in the background, shoot during the least bright moon phases.
Be sure to download astronomy locator apps if you plan on including the moon or Milky Way in your photos. Apps such as The Photographer’s Ephemeris or PhotoPills can help you throughout the entire process.
These apps will give you the necessary information about lighting, location, and orientation of celestial objects.
7. Create a Google Map
After deciding the sites to visit, consider creating a custom Google map. These maps allow you to find and pin places on-the-go. Having a custom map makes your trip’s itinerary easy to access and navigate.
To create the map, sign in to Google and go to the Google Maps webpage. Go to “my places” by clicking on the menu icon in the top left corner. Head over to the Maps tab and select the “Create Map” option.
On the map creation page, you can find the locations you had identified from your research. Then, add each of these locations by clicking the marker icon. You will then see a box where to add the name/description of that place.

Repeat these steps for each location you want on the map. You can color-code them for a more personalized experience. Do not forget to name the map for identification.
Once your custom map(s) is ready, you can access and view it in the Google Maps mobile app on your smartphone whenever you need it. Your custom maps will be available on the “My Places” menu on Google Maps
During your trip, your custom maps will be your assistant for finding directions to the places you are visiting.
8. Know Your Pace of Travel
Based on your planned activities you may travel more or less frequently during your trip. Keep in mind that you are likely to spend more money if you frequently change locations.
While mapping out your trip, consider minimizing how much travel you have to do throughout your stay at a given place. Planning your pace of travel well can reduce your daily outlays and help you save money.
9. Consider Group Tours
Decide whether to travel independently or join a tour group (either a photo-focused tour group or regular tour groups).
Each of these options has its perks and limitations. You’ll want to weigh them against each other and decide which works better for you.
If you join a group tour, you can benefit from the tour leader’s experience with the locations you’re trying to photograph. You may tap into their knowledge of the most photogenic spots in a location. This can spare you a good deal of time, especially if you are trying to capture images that are in remote areas and are hard to find.
Notice, however, that this alternative may mean skimping on quality. In tour groups, you won’t have much control over the time you’ll have on the places you’ll visit. At times, you may need to leave before you get your ideal shots because of tight schedules.
Photo-tour groups are generally more expensive than regular tour groups. They, however, have the edge over regular group tours.
Photo-focused tour groups is a great way to grow your skills as a photographer. There’s always that more experienced member of the group to learn something from.
Perhaps the greatest benefit of joining photo-group tours is meeting like-minded people and making new friends. I met some of my best and oldest friends this way. Photo-group tours can also be invaluable if you are a beginner. Photography guides are often not only great teachers but also a great source of inspiration.
Just make sure to take advantage of every session to hone your photography skills. You can always go independent after that.
10. Consider Arranging for a Local Guide
Private local guides are generally more flexible to your schedule and location. There are times when having one with you will make the most sense.
For starters, you may need a private guide when visiting a remote location that has not been thoroughly documented. In such a situation, there is often not enough recorded information to guide you. The guide’s knowledge of the place will, therefore, come in handy.
 A private guide will also be helpful if you’re planning to travel to a place where information is not easily accessible. This could, for instance, be a location where internet access is a problem. You won’t be able to use Google Maps, and so you may have to turn to the guide for assistance in finding directions or figuring out transportation.
Further, it will be prudent to have a local private guide with you if you’d like to experience a location in a personalized way. With the guide, you’ll be having someone to help you communicate with the locals in their language. This can be way more effective than any translation app or the few local phrases you might have learned before your visit.
Also, if you are getting into a festival, your local guide will provide the much-needed interpretation to help you put everything into perspective as you go about taking your photos.
Similar to group tours, a personal guide can be a rich source of ideas for photo locations. With a guide, you’ll be able to discover unique places even if you’re visiting an area only for a short period.
If you are on a budget though, a private guide can turn out as an expensive option. A great alternative would be to consider couch surfing; the service that connects you to a global community of travelers.
Your choice should be based on your situation and budget. There are enough alternatives here from which to choose what works best for you.
11. Know Where to Stay
When visiting a new location, you could travel cheap or go for regular high-end options based on different considerations.
Keep in mind that staying in hotels could mean you’re not entirely isolated from the people at your destination and the local life. Spending more money often increases your likelihood of being in the company of other travelers who may not benefit your photography.
Even though it is advisable to go for modest options over the pricier selections typically associated with tourists, your ultimate choice should still be informed by your partialities and needs such as privacy and safety. It won’t be prudent to skimp on accommodation if that will put your expensive gear at risk, so be sure to choose carefully.
12. Stay in the heart of the action.
 Aim to stay near, or right at the heart of the action. You don’t want to have to travel several kilometers to reach the subject(s) you want to photograph each day. There might be traffic conditions that could mean missing that perfect sunrise/sunset shot that was pivotal to your photo excursion.
Also, it helps with traveling cheap overall. Booking a hotel that is right next to your subject will mean that you don’t pay for transport to get to it.
Whatever it is you want to shoot find accommodation that’s close to it. You’ll be extremely happy to be able to take your shots even from the comfort of your hotel window.
13. Learn About Transportation
As a travel photographer, you’ll frequently find yourself using one or more of the three common means of transport: airplane, train, and bus.
If you are traveling across countries or only for comparatively short distances you can choose to go by road, train or air; based on comfort, cost and time considerations.
Comfort
Trains generally have more legroom than buses and planes, which can make your journey far more relaxed especially if you have a sleeper seat. There are also no bumps on the railway which makes it a smooth means of transportation.
 Most trains and planes provide electrical outlets for your devices. However, trains are generally more convenient because they do not restrict your use of electronic devices. The luggage rules are also friendlier compared to what you get on a plane. With all the photography gear, this allowance can be a lifesaver.
Cars are convenient if you want to stop from time to time to take shots. Trains stop only at designated terminals, which is a minus in this regard.
Car’s are also the friendliest when it comes to luggage experience. Traveling by car can be particularly advantageous for photographers who carry a lot of gear. You can conveniently get the gear to the destination without having to worry about moving it some other way.
Cost of travel
One of the reasons it is recommended that you stay somewhere near your subject is to save on the cost of travel. You often won’t pay anything to walk to the scene you’re photographing. Or, you could pay only modest bus fare and save on your transportation budget.
Traveling by road is the cheapest over short distances. However, this becomes the most expensive for long-distance travel.
If you are in a group, consider going by car if it will lower the cost per person. It may be that buying individual tickets for a plane, train or bus is more expensive.
If you are going to a far place, traveling by air or railway will generally cost less. If there is a railway line connecting the destinations, then consider train as well.
There are instances when traveling by air will be cheaper than going by train, and vice versa. The rule of thumb is to do your homework and figure out which option is likely to help you save more.
Notice, though, that both means become more expensive when you buy your tickets closer to your departure date. However, trains are generally more forgiving than planes. Airlines are notorious for charging heavy penalties when it comes to last-minute ticket purchases.
Go for planes if you can purchase your ticket well in advance. However, if you’re a travel photographer, you may find this to be challenging. This is because waiting to capture the perfect shot often necessitates last minute changes to your itinerary. In this case, you may want to travel by train instead since it is comparatively cheaper on last-minute travel.
Time spent traveling
 There is a simple rule of thumb when it comes to time and travel: catch a bus or train for short trips, and use a plane on long trips.
Flying can be time wasting for short trips. You will often take at least 30 minutes to get to the airport and spend another 60-90 minutes at the airport just waiting for your flight. Then there is flight time. Often, it is not the most convenient in short trip scenarios.
There’s also the option of driving yourself to the location. While this can be a wasteful way to use your time, driving could give you a chance to check out places that you may have missed during your research.
I have taken some of my favorite pictures by simply pulling over in between destinations. You never know when you’re going to spot something amazing. Driving could be a great way to take those rare pictures of unknown places.
So, although traveling by plane, train, or bus allows you to do other things (read a book, work, sleep), driving has some great advantages.
For overnight trips, go on a train rather than travel by plane. You’ll get a chance to sleep on a decent bed on the train, which is often not available when flying. This means you’ll skip the cost of a hotel room for the night. Trains are also more convenient in terms of collecting your baggage, security checks, and use of mobile phone while traveling.
14. Remember Travel Documents
 Certain countries require you to carry a visa while others only require regular travel identification such as a passport. Find these out in good time before you proceed to book your plane ticket.
With regards to other documents such as boarding passes and reservation papers, ensure you bring both hard and electronic copies with you. Should you misplace the hard copies, you’ll still have something to use whenever needed. And in the off chance that you lose your devices, you’ll have the hard, printed copies of these documents to fall back on.
15. Know Your Cell Phone Plan
Your cell phone internet charges are likely to escalate when using your service overseas.
It’s best to be informed about your current plan to avoid an expensive phone bill. Look for options that allow you to call and text without incurring additional fees. Whenever you can, use Wifi to make your phone calls.
Most major phone carriers have international plans that will give you the ability to talk, text, and surf the web while you travel.
I use T-Mobile, they offer unlimited text and data in over 210 countries. International calling is additional but is typically around 20-30 cents per minute. One of my favorite features about this plan is that any international calls made to other T-mobile carriers are free.
Be sure to check out your mobile carriers international travel plan before you leave for your trip.
14. Learn the Language
While it would be practically impossible to learn every language in each place you visit, it will make a difference to learn a phrase or two.
Doing this can go along way in ensuring you have pleasant travel experience.
Knowing the basics can increase your confidence in your daily activities and interactions throughout your trip. For example, knowing how to read basic signs and menus written in the local language can make daily navigation much more manageable.
Knowledge of the native language can also help you make friends and build rapport with the locals. For instance, when locals hear you speak their language, they’ll see your effort and be more likely willing to reciprocate. This could mean offering to help you with your endeavors. In the end, you may learn things you wouldn’t discover any other way, such as unique shooting locations unknown to most travelers.
Furthermore, knowing the local language can give you a deeper understanding of some local practices and values. With that, you’ll be in a better position to show respect for them and increase your chances of being accepted.
Learning the language can enhance your travel experience in a way that none of the other things mentioned on this to-do list can.
15. Buy Insurance for Your Gear
Be sure to get insurance for your photography gear so you’ll not have to be afraid of breaking or losing them. Do your research and ensure you’re getting the right insurance cover for those unforeseen possibilities lurking behind each travel experience.
16. Buy Travel Insurance
When you travel many things are out of your control. Travel insurance protects you from unpredictable events that could happen as you travel. It’s your financial safety net in the event that something goes wrong.
Let’s say your flight is delayed and you miss that photography tour you have been waiting for. Depending on your policy, the cost of your photography tour and any additional expenses due to the delay may be covered.
Travel insurance can also cover you in the event of a health emergency. If you need medical attention, travel insurance will assist with the cost of the medical bills so you don’t burden the entire cost.
Most travel insurance also offers assistance in the event of smaller travel mishaps such as a lost passport or luggage, if you become stranded without transportation, or if your hotel falls through.
So before you go on your next trip, look into travel insurance to make sure you’re covered in the event your trip doesn’t go as planned.
Conclusion
Research is one of the most critical parts of your trip as a photographer. It will determine what you pack, and how you go about everything during your trip. This way, it can make or break your entire experience. So, ensure you do your best in research so that you can be sure of a smooth trip and the best shots wherever you go.
Read the rest of the series: